Wednesday, January 31, 2018

NEW BLOG!

Why hello there!

It's been a long time and I've been missing you my friends.

Today I have an announcement.

After much thought and consideration, I will no longer be posting on this blog address because...

I have moved!

Aaah! Yes that is right. And I am so excited.

My new blog is:


www.thecookstreat.com


You can also follow me on:

I would love it if you would hop on over and check out my new blog with lots of new recipes.

Also, you can sign up for my e-mail list here:

Don't miss a recipe from The Cook's Treat!

Subscribe via email:


In addition to the updates about blog posts that will come regularly, I will be sending out a regular newsletter to e-mail subscribers with exclusive content including recipes, menu plans, cooking tips and more. So be sure to subscribe!

I can't wait to see you over at The Cook's Treat.

Thursday, April 28, 2016

Chewy Coconut Oatmeal Cookies {Dairy Free}


One of the things that's probably the hardest about being dairy/soy free is the difficulty finding treats. I have a sweet tooth like no other and it's hard to be surrounded by food that you can't eat. Before I found this recipe, I tried so many cookie recipes that left a lot to be desired. 

They were oookkkaaay...but...

Well okay...but recipes are not the kind of recipes I like to share here. And I'm happy to say I found one that I looooove! And will make again and again even when I'm not dairy free. These are chewy and soft with the perfect texture. They hold their shape beautifully well and are really a dairy-free girl's dream come true. 

Make sure you use the wonder flour or try another type of whole-grain flour. I would use spelt or oat flour if it was me. Try to stay away from whole-wheat. I think it would be a little too dense for these cookies. I made these originally with all white flour and blech. They tasted far too pasty for me. They grains give them such a wonderful flavor.

The only drawback to these cookies is that they don't store very long. Well, that's only a drawback if you don't eat them immediately and that won't be a problem. But, if you do want to save them for more than a day or so be sure to put them in the freezer. They freeze beautifully well. Then just pop them in the microwave for 30 seconds or so and they come out tasting as good as they did right out of the oven.

Well pardon me. Here I am blabbing on and on... and you've got cookies to make. I won't keep you from these any longer. I know when it's time to leave. 


Chewy Coconut Oatmeal Cookies
Printable Recipe

*Makes just over 3 dozen cookies

INGREDIENTS:
1-3/4 Cup wonder flour
1 Cup all purpose white flour
1 tsp. baking soda
1 tsp. baking powder
1-1/2 tsp. cinnamon
1/4 tsp. salt
1 Cup coconut oil (measured solid), melted and slightly cooled
1 Cup granulated sugar
1 Cup brown sugar
2 large eggs
2 tsp. vanilla extract
1 Cup quick oats

DIRECTIONS:
Preheat oven to 350 F. Line a baking sheet with parchment paper and set aside.

In a large bowl, whisk together flours, baking soda, baking powder, cinnamon, and salt. Set aside.

In another large bowl (or in the bowl of a stand mixer) beat together coconut oil, sugars, eggs and vanilla until fluffy and well-blended. Gradually pour in dry ingredients, mixing after each addition until combined. Stir in quick oats.

Scoop dough with a 2-Tablespoon cookie scoop or roll equivalent amount of dough in a ball and place on prepared baking sheet. Bake for 10 minutes at 350 F or until edges turn light golden brown. Remove from oven and let cookies rest on baking sheet for 2 minutes, before transferring to a wire rack to cool completely.

*Recipe Source: Slightly adapted from Culinary Couture

Thursday, March 31, 2016

Toasted Skillet 6-Grain Cereal


Well hello there!

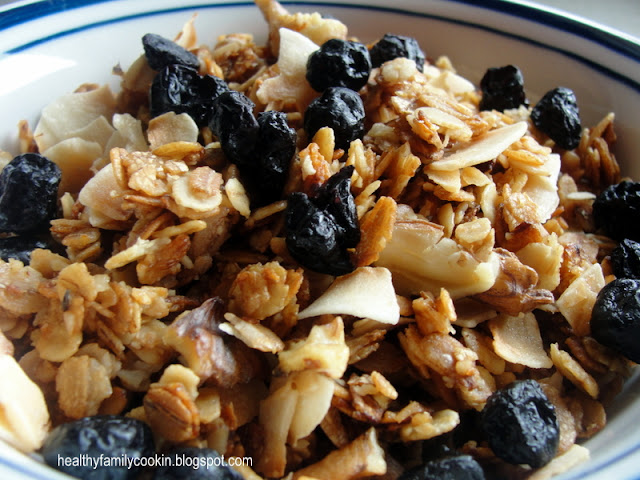
I'm popping in to share this amazing recipe today. I absolutely love this crunchy, flavorful cereal. Move over cold cereals, here's your newest competition for fast and easy breakfasts.

And the taste.

Oh my the taste.

Cut up some fresh strawberries, pour in a little milk (or cream ...yum!)...or if you're dairy free like me almond milk is amazing too. Dried blueberries are also a huge fav and if you're like me it's nice to have something yummy on hand and not have to shop every other day.

Brandon came up with this recipe to use our 6-grain rolled oat cereal we were gifted for Christmas a few years back by his mom. And now we can't live without it. It seriously is amazing with the 6-grain rolled cereal. Where can you buy it? Well I found it on Amazon here. It comes in a 50-lb. bag which may seem like a lot, but when you're making it as often as we do, you use a lot. You may be able to find a similar item in your local grocery store. Make sure you buy the rolled cereal mix and not the cracked - there will be a huge difference in the taste. If you can't find it, this recipe also works with old fashioned rolled oats, but I'm telling you it's so much better with the 6-grain cereal so try to get some of that.

This recipe is a great one to give as a gift. I love that it makes exactly a quart and fits beautifully in a quart-sized jar. I've given it before and everyone always asks for the recipe. It's so yummy.

I can't wait to try some of this with the fresh strawberries that are coming out this spring. Talk about heaven in a bowl!


Toasted Skillet 6-Grain Cereal
Printable Recipe

*Makes 1 Quart

A crunchy granola type cereal that is delicious plain. Or I like to eat it with milk or yogurt and fruit on top. My choices of fruit would be berries (dried or fresh) or peaches. 

INGREDIENTS:
6 Tbsp. salted butter (or 1/3 Cup coconut oil plus 1/4 tsp. salt)
3 Tbsp. honey
1/2 tsp. vanilla
2 Cups 6-Grain rolled cereal (or alternately use old fashioned rolled oats)
1/2 Cup chopped nuts (my choices would be walnuts, almonds, or pecans)
1/2 Cup toasted coconut chips, optional*

DIRECTIONS:
In a large skillet over medium heat melt butter (or coconut oil plus salt) and honey. Add vanilla and mix together. Add 6-grain rolled cereal and chopped nuts and stir until combined. Turn down heat slightly and roast cereal until golden brown about 10-15 minutes. Stir often so the cereal doesn't burn, especially near the end of cooking time. Let cereal cool. It will crisp up as it cools until it is nice and crunchy. Add the coconut flakes, if using. Store in an air-tight container for up to two weeks.

Recipe Source: healthyfamilycookin.blogspot.com


*Here's the brand of toasted coconut chips that I get (at Costco).

*Note this post contains affiliate links.

Wednesday, January 20, 2016

Corn Chowder {Dairy, Gluten, Egg & Soy Free}


I never thought I'd say it but dairy free is getting easier. Most of the battle of dairy free is figuring out what you CAN eat. There are so many can'ts. Basically everything prepackaged is out. Especially since I'm soy free too. The good thing I was already used to cooking meals from scratch. I can't imagine what people do that don't cook from scratch.

The hardest part for me was finding recipes that didn't taste like "dairy free". You know, comfort food. The real deal.

Well I'm excited to report that this chowder is comfort food at its finest. And it doesn't taste like anything free (but it happens to be Dairy, Gluten, Egg, and Soy Free). I wouldn't change a thing even when I can have dairy again. And that's saying something (since I'm a huge whiner about missing certain things...um butter, yes you know who you are).

Creamy chowder, packed with healthy vegetables with a rich hearty flavor. Serve it up with a slice of fresh bread or rolls. Delicious.

Corn Chowder {Dairy, Gluten, Egg & Soy Free}

INGREDIENTS:
12 to 16 oz. bacon, roughly chopped
1 medium onion, chopped
4 cloves garlic, minced
4 stalks celery, chopped
4 medium carrots, chopped
1 red bell pepper, chopped
3 lbs. potatoes, chopped
8 cups chicken stock
1 Tbsp. cornstarch
1-14oz. can full-fat coconut milk
2 Cups frozen corn
2 Tbsp. freshly parsley, chopped (or 2 tsp. dried)
salt and pepper, to taste

DIRECTIONS:
Heat a soup pot on medium heat and add the chopped bacon. Cook until bacon is starting to brown and crisp. Remove bacon to paper towels to drain, leaving about 1/4 cup of bacon fat. Add the onions, garlic, celery, carrots, and red bell pepper and saute on medium heat until the onions start to turn clear. Add potatoes and chicken broth and increase the heat to medium high. Bring to a boil and then let simmer until potatoes are fork tender (about 15 minutes). Remove about a third of the soup and blend in a blender before returning to the pot. This will help to thicken the soup. Mix 1 Tbsp. cornstarch with 1/3 of the can of coconut milk. Add to the soup along with the rest of the coconut milk, the corn, cooked bacon, and parsley. Heat until warm and then add salt and freshly ground pepper to taste. Serve warm.

Recipe Source: Slightly adapted from Tia's Kitchen

Friday, November 27, 2015

Coconut Cream Pie {Dairy Free}


I'm not even going to start into the apologies for not posting for five (six?) months. I'll just give you a quick update and then get right onto sharing the goodness of this amazing recipe.

We welcomed our baby girl who was born almost five months ago. She's a sweetie and so much fun. After not having a baby for 7-1/2 years it's kind of culture shock to have one again. But it's been so much fun. I've wanted to cherish every moment with her.

On top of that, I am homeschooling my younger son this year. Long story. But we are enjoying it. It takes a lot of time. But it's been a wonderful experience.

Also, we had some food allergy issues with the baby. I am nursing her and we found out she is allergic to the dairy protein found in my milk (plus soy we think). We had to eliminate all sorts of foods to figure things out (eggs, nuts, soy, diary). And we are still in the process of figuring that all out.

As a result of all of this, I've discovered a whole new world of cooking allergy friendly and finding amazing and delicious recipes to share. I made this coconut cream pie yesterday for Thanksgiving and it was so astoundingly delicious (whether you are dairy free or not) that I couldn't wait to share it even though I have a backlog of a million recipes I haven't shared with you yet. In case you are interested it is also soy, nut, and egg white free. Enjoy!

Coconut Cream Pie {Dairy Free}
Printable Recipe

*Makes one 10" Pie

INGREDIENTS:

Pie Crust:
1 1/2 cups all-purpose flour
1 tsp. salt
1/3 cup white sugar
1/2 cup canola oil
3 Tbsp. water

Pie Filling:
3 Cups full fat canned coconut milk
3 egg yolks
¾ Cup white sugar
1/3 Cup cornstarch
¼ tsp. salt
1 tsp. vanilla extract
1 tsp. coconut extract

Garnish:
1 Cup flaked coconut or coconut chips, toasted (*See Note below)

DIRECTIONS:

For the Crust:
Preheat oven to 200 F. In a large mixing bowl, combine all dry ingredients for the crust. Add oil and stir. Add water as needed until it just sticks together but is not gummy. Press evenly into a 10-inch pie pan. Put the crust in the oven and immediately increase the temperature to 350 F. Bake 20-25 minutes or until edges begin to turn golden brown. Let cool completely.

For the Pie:
In a medium saucepan, combine coconut milk, egg yolks, sugar, cornstarch and salt. Bring to a boil over medium-low heat, stirring constantly. Mixture will become very thick. Remove from heat, and stir in coconut extract and the vanilla extract. Strain through a fine mesh strainer for a smoother consistency, if desired. Let mixture cool to the touch. Then pour the custard into the baked and cooled pie shell and chill 2-4 hours or until firm. When ready to serve, top each individual piece with the toasted coconut.

*NOTE: To toast coconut, spread coconut on baking sheet in an even layer and bake at 325 degrees, tossing often, until lightly toasted, about 12-15 minutes.

*Pie filling adapted from Mel's Kitchen Cafe, converted to be dairy free. Pie Crust adapted from Chocolate Covered Katie.

Thursday, June 4, 2015

Easy Lasagna


If you haven't guessed by now posting may a bit sporadic in the next month or two. I mentioned in my last post that we are expecting a new daughter in a month. Like always, I have lots of recipes waiting in the wings to be shared, but just not enough time in the day to share them. This is one that's been waiting for a while that I decided I wouldn't let wait any longer. It's so easy and so good and that makes it definitely one our family's favorites. I'm all about taking recipes that are already easy and making them healthier and easier. That's how this recipe was born and it's now my go-to recipe for a quick lasagna. Hope you enjoy!

Easy Lasagna
Printable Recipe

*Serves 8-10

*Note: To make this recipe even easier, I like to make the homemade spaghetti sauce with quinoa ahead of time in a large batch and freeze a recipes worth in quart bags. I will also sometimes precook and freeze the ground beef so you can skip the browning step. These shortcuts make it really easy to whip up this lasagna in just a few minutes.

INGREDIENTS:
15 lasagna noodles
1/2 lb. ground beef
1 recipe Homemade Spaghetti Sauce with Quinoa or 3 to 4 Cups Spaghetti Sauce
16 oz. cottage or ricotta cheese
4 Cups cheese

DIRECTIONS:
Preheat oven to 350 F. In a large pan of boiling water add the lasagna noodles and cook only for about 4 to 5 minutes until very al dente. This is the secret to lasagna without soggy noodles. Meanwhile brown the ground beef in a large skillet over medium heat, draining of the excess grease. Return the skillet to the heat and add the spaghetti sauce and cottage or ricotta cheese. Once the noodles are done, remove from heat and drain to stop the cooking process. You may want to retain just a little bit of hot water in the bottom of the pan to keep them from going stiff or you can lay them out flat. In a 9x13 pan, add a little sauce to the bottom of the pan and then layer 3 noodles followed by sauce and then sprinkle with cheese. Repeat this pattern of layers until all the noodles are used, making sure to reserve enough sauce and cheese for the top layers. Bake 350 F for about 35 minutes. Remove from oven and let sit for about 10 minutes before serving.

*Recipe Source: healthyfamilycookin.blogspot.com

Tuesday, May 19, 2015

Sweet and Spicy Salmon


It's been ages since I've posted and I apologize for my negligence. It's been a crazy last month or so. To give you a quick update, I'm about six weeks away from delivering our third child. We've been busy getting things ready for this new little girl. (Yes, that's right! Our first girl. We couldn't be more thrilled.) On top of that we're finishing out the last couple of weeks of school with all the chaos that that brings. On top of that we've had lots of other family emergencies crop up and it's been quite the adventure trying to navigate all those.

But here I am. For the time being. And happy to be posting a wonderful and amazing recipe with you that will save you big time if you're experiencing anything like the chaos that we are right now. This recipe is quick (less than 30 minutes from start to finish), light (perfect for spring or summer), and totally taste-bud-stunning delicious. It's fancy enough for a weekend, but easy enough for everyday. Not too spicy, but enough flavor to let those taste buds rise to heaven. And I won't even go into how healthy Salmon is except to say it's really good for you! We like to serve this with brown rice and a green salad (the salad pictured is fresh from our spring garden). Enjoy.


Sweet and Spicy Salmon
Printable Recipe

INGREDIENTS:
1 Tbsp. honey
2 Tbsp. extra virgin olive oil, divided
4 4-oz. salmon fillets
2 Tbsp. brown sugar
1 Tbsp. chili powder
1 tsp. cumin
1/8 tsp. salt
1/8 tsp. black pepper

DIRECTIONS:
In a shallow dish, combine honey and 1 Tbsp. extra virgin olive oil. Lightly brush onto each salmon fillet, flesh side up. In another shallow dish, combine brown sugar, chili powder, cumin, salt, and pepper to make a dry rub. Using your hands, rub mixture onto the flesh sides of each salmon fillet. Heat large skillet to medium-high heat. Add remaining 1 Tbsp. olive oil. When hot, add seasoned salmon fillets skin side down and immediately reduce heat to medium-low. Cover with a splatter guard (a large lid or flat pizza pan works great in a pinch). Pan-sear salmon fillets for 7 minutes, then flip and cook for an additional 1-2 minutes or until a thermometer inserted in fillet reads 145 degrees F. Remove from heat and serve immediately. We like to serve this salmon with brown rice and a fresh garden salad.

Recipe Source: Adapted slightly from Skinnymom.com

Popular Posts

LinkWithin

Related Posts with Thumbnails