Showing posts with label Canning. Show all posts

Tuesday, July 29, 2014

Canning Sweet Relish

We've been enjoying this sweet relish for years. Most barbecues at our house include a jar of this delectable condiment and it's just not the same without it. We also love this sweet relish on sandwiches, it really sends them over the top. If you've never had a home canned sweet relish in your life you are missing out. Don't even bother with the store junk because it doesn't even stand a chance of comparison. And guess what else is so awesome about this recipe? You can make it with either cucumbers OR zucchini! That's right zucchini. And we've made it both ways and there really isn't a lot of difference in the final product. It's just. Plain. Awesome.

Oh and look at these jars. Aren't they stunningly beautiful? There's something just gorgeous about jars of home canned anything.

Aren't they beautiful?
Before I share the recipe let me just remind you that if you're new to canning, please read over the points from the canning introduction post that I posted a few years ago (and was newly updated just today!) before you begin. Canning unlike cooking requires a bit more scientific precision. Don't change the amounts or cooking times. Spices can be added or taken out to your liking.

First a few tips for relish canning success:

  • Always use good quality produce. Freshly picked is always best and will give you the most nutrition bang-for-your-buck. For best results, use cucumbers or zucchini that are small and tender (not those giants that have gotten away from you). 
  • Be especially careful for this recipe that your jars don't tip once you put them in the water bath canner. If they do, simple pull them out and wipe the rims again and carefully place them back in the canner. This recipe contains tiny seeds that may get caught under the seals of the lids causing them not to seal. If this happens, the contents of the jars can either be reprocessed or you can stick the jar in the refrigerator to be used within a few weeks.

Sweet Pickle Relish
Printable Recipe

*Makes 6-8 pints

*Note: For safety, do not change the quantities any of the ingredients.

INGREDIENTS:
1 Quart chopped cucumbers or zucchini (about 4 medium)
2 Cups chopped onions (about 2 medium)
1 Cup chopped sweet green pepper (about 1 medium)
1 Cup chopped sweet red pepper (about 1 medium)
1/4 Cup salt
3-1/2 Cups sugar
1 Tablespoon celery seed
1 Tablespoon mustard seed
2 Cups cider vinegar

DIRECTIONS:
Combine cucumbers or zucchini, onions, green and red peppers in a large bowl. Sprinkle with salt and cover with cold water. Let stand 2 hours. Drain; rinse and drain thoroughly. Combine sugar, spices and vinegar in a large saucepot. Bring to a boil. Add drained vegetables; simmer 10 minutes. Pack hot relish into hot jars, leaving 1/4" headspace. Remove air bubbles. Wipe jar rims clean. Adjust lids and process according to times below (based on your current elevation).

*Note: For best success, make sure your jars do not tip once they are placed in the water bath canner. I've noticed that tipping can often cause the little seeds to find their way under the jar lids, making it so that the jars don't seal.

Processing Times:
10 min (0-1,000 ft) 15 min (1,001-3,000 ft)
20 min (3,001-6,000 ft) 25 min (6,001-8,000 ft)
30 min (8,000-10,000 ft)

Recipe Source: Slightly adapted from Ball Blue Book of Preserving

Wednesday, August 14, 2013

Canning Salsa

Like many others that I've posted, this salsa recipe is long overdue. I've been using it for about 7 years with a lot of success and just haven't gotten around to posting it on here yet...The main problem being that the appropriate time to post it is smack in the middle of canning season where it's difficult to post much of anything because my life is a little crazy. That being said, please don't take the posting of this recipe as an indication that my life is any less crazy right now. Because let me assure you that that is not the case. In fact, I'll just give you a brief synopsis. Within the past few days, I canned 14 pints + 2 half-pints of salsa, made 4 quarts of pickles, hosted my in-laws, planned a bridal shower and helped with a wedding, got the kids ready for school, weeded the garden to get ready for a company BBQ. That's not even counting my normal jobs as a mother including moderating all the internal squabbling that happens with kids they are ready to go back to school. And honestly, most days the latter seems like what I spend the majority of my time with...but anyway...I apologize for not being quite as consistent with my posts as I would like to be. Life has caught up to me and I'm trying to get it back in balance. Until then...things may be a little hit and miss for a while. And I appreciate your patience.


Back to the topic, this is a great basic recipe for canned salsa. In my opinion, fresh salsa is always the best (this is still my favorite recipe - this year we added some chopped tomatilloes - amazing!). But in the dead of winter when all the tomatoes to be had taste like plastic, we pull out a bottle of this and remember the wonderful harvest season. And enjoy. My littlest boy can down a whole pint of this stuff in one sitting. It's crazy. He loves it even better than the fresh. He and Brandon call each other "salsa buddies" and enjoy their ritual of eating salsa every Saturday for lunch. 

It's been a while since I've posted a canning recipe, so let me just remind you that if you're new to canning, please read over the points from the canning introduction post that I posted a few years ago before you begin. Canning unlike cooking requires a bit more scientific precision. The nice thing about this recipe is that it's easy to adapt it for your own tastes. It's kind of like a formula that you can start with and change to your own liking. If you like your salsa hot, use a lot of hot peppers. If you don't, use mostly bell peppers. Easy stuff. But be sure you only change the things in the recipe that are changeable. Don't change the amounts or cooking times. Spices can be added or taken out to your liking as well. And I always like to tell you the source for the canning recipes that I post, because these recipes may vary a bit over time as new safety things are tested and that source is here. They have some other great canning recipes on there too if you're interested.

First a few tips for salsa canning success:
  • Always use good quality tomatoes and peppers. Freshly picked is always best and will give you the most nutrition bang-for-your-buck.
  • Wear rubber gloves while handling hot peppers and do not touch your face or eyes until your hands have been thoroughly washed with soap and water. I know this one from painful experience.
  • Invest in a kitchen scale to measure the weights of ingredients. It really is the most accurate way to do it when you're canning. And it will be worth the cost.

Chile Salsa

*Makes 6-8 pints

INGREDIENTS:
5 lbs. tomatoes, any variety
2 lbs. peppers (I use a mixture of hot and mild peppers - you can also use canned chile peppers for this)
1 lb. onions, any variety
1 Cup bottled lemon juice OR 1 Cup Vinegar (5% acidity)
3 tsp. salt*
1/2 tsp. pepper*
3 cloves fresh garlic, minced*
1-1/2 Tbsp. dried oregano*
1-1/2 Tbsp. dried cilantro*
1 Tbsp. cumin*

DIRECTIONS:
Peel peppers if desired (I never do). Wash tomatoes and dip in boiling water for 30 to 60 seconds or until skins split. Then dip in cold water, slip off skins, and remove cores. Trim off any bruised or discolored portions. Coarsely chop tomatoes, peppers and washed onions (I use a chopper for this). Add chopped peppers, onions, and remaining ingredients in a large saucepan. Heat to a boil and simmer 10 minutes. Fill jars, leaving 1/2" headspace. Adjust lids and process pints or half pints in a boiling water canner for 20 minutes (1,001-6,000 ft).

*Note: The starred ingredients are optional and quantities can be omitted or changed if desired. You can also add other dried spices to your tastes. But for safety, do not change the quantities any of the non-starred ingredients.

Recipe Source: Adapted from USU Extension service


Don't you just love looking at beautiful bottles of food all lined up in a row?

Thursday, August 16, 2012

Sweet Peach Jam

It's harvest time here and we're LOVING IT!! We harvest about a bushel of peaches off of our Red Haven Peach tree. Here's one of our favorite recipes to enjoy peaches all year round!


Sweet Peach Jam

*Makes about 5 cups

*Note: This jam also freezes well if you don’t want to can. Just put the hot jam in jars (leaving ½” headspace) and stick them in the freezer when they’ve cooled.

INGREDIENTS:
About 4 lbs. peaches
2 Tbsp. fresh lemon juice
3 Cups Sugar

DIRECTIONS:
1. Wash jars, lids, bands and rinse well. Heat jars and lids in boiling water. Heat up water in your boiling water bath canner.

2. Prepare fruit by peeling, removing the seeds, and finely chopping. Measure exactly 4-1/2 Cups of chopped peaches into a 6 or 8 quart saucepan. Stir in lemon juice and water.

3. Measure 3 Cups of sugar into separate bowl. In another small bowl, mix 1/4 Cup sugar from measured amount and 1 box Less or No Sugar Needed Fruit Pectin (Make sure it specifically says "for less or no sugar needed"). Stir pectin-sugar mixture into fruit in sauce pot. Add 1/2 tsp. butter or margarine to reduce foaming, if desired (I don't usually do this).

4. Bring mixture to a full rolling boil (a boil that doesn't stop bubbling when stirred) on high heat, stirring constantly. Stir in remaining sugar quickly. Return to full rolling boil and boil exactly 1 minute, stirring constantly. Remove from heat. Skim off any foam.

5. Take empty jars out of simmering water, one at a time and ladle hot jam into hot jars, leaving 1/8" headspace. Wipe the rims and threads of each jar with a clean, damp cloth. Center the heated lid on jar and screw band down until fingertip tight. Then place jar in canner and repeat with other jars.

6. Once canner is full, add water if necessary to cover jars by 1 or 2 inches. Place lid on canner and bring water to a boil and lower heat until water stays at a gentle boil. Process according to times below (based on your current elevation).

Processing Times:
10 min (0-1,000 ft) 15 min (1,001-3,000 ft) 20 min (3,001-6,000 ft) 25 min (6,001-8,000) 30 min (8,001-10,000)

7. After processing, turn off heat and remove the lid for 5 minutes before removing jars from the canner. Set the jars upright on a towel to cool for 12 to 24 hours. Once jars are cool, test jars for a seal by pressing the center of the lid. The lid should not flex up and down. If it does, immediately refrigerate or reprocess with a new lid for the full length of time. Clean jars and remove bands. Label and store in a cool, dry, dark place for up to one year.

Don't forget to save plenty of fresh peaches for eating!!!

Tuesday, May 8, 2012

Preserving Strawberries

I love this time of year when strawberries are in season! There are so many wonderful foods to make with juicy, red, ripe strawberries. And they are good for you as I mentioned last week when I introduced these awesome fruits.

Last week I also shared with you one of my favorite dessert recipes: Strawberry lush (with a whole grain crust). And today I'm going to teach you how to preserve them by freezing whole or making jam. Either method you choose, you need to first prepare the strawberries.

Preparing
  1. Select strawberries to preserve that are good quality: ripe and firm, with no soft or moldy spots. Poor quality fruit will make horrible preserved fruit!
  2. Wash the strawberries
  3. Drain them
  4. And cut off the caps (green stems)
That's it! It's very easy.

Freezing
Freezing Strawberries is the easiest way I know to preserve their delicious goodness. I like to freeze them whole because it's so quick and they don't stick together as much after they are frozen. It's easy to pull out just the number you need when making a smoothie or unthawing them for a dessert.

All you need are some prepared strawberries and heavy duty freezer bags (any size you want).
  1. Place prepared strawberries in the freezer bags
  2. Remove as much air as you can
  3. Seal and label the bags
  4. Store in the freezer 


Frozen strawberries will keep in the freezer for at least a year. We love to use them in smoothies, lemonades or desserts!

Strawberry Jam
The easiest way to make strawberry jam is the freezer jam. You simply buy a packet of freezer pectin and follow the instructions on the package, ladle the jam in freezer containers and freeze. Really simple and very delicious! Since my freezer happened to be about full after freezing my whole strawberries, this time I decided to venture out of the box and make canned strawberry jam. 

One of the reasons I love to make homemade jam is because you can control the amount of sugar that you add to the jam. You do have to be kind of careful though because if you adjust the sugar in a recipe, sometimes it will not set up right (staying too runny, or too thick). So I'm going to share with you my recipe for strawberry jam that our family loves because it has the perfect amount of sugar. It's sweet enough to enjoy, but not so sugary that you can't taste the berry flavor. 

If you're not used to canning, you can see my general canning instructions here to help you get started or this jam can be made according to the recipe and frozen in freezer containers (or glass jars). I've done that too and it works just great!

Strawberry Jam

*NOTE: Be sure to use no sugar needed fruit pectin! This is what allows the jam to set up without as much sugar.

*Makes about 8-10 8-oz. jars

INGREDIENTS:
5 Cups crushed strawberries (approximately 3 1/2 lbs. strawberries)
2.5 Cups white sugar
1 Cup water
1 pkg. OR 3 Tbsp. no sugar needed fruit pectin
Jars, lids, bands, canning equipment, etc.

DIRECTIONS:
1.        Wash jars, lids, bands and rinse well. Heat jars and lids in boiling water. Heat up water in your boiling water bath canner.

2.        Wash and prepare strawberries. Crush one layer at a time until you have five cups. Important: do not put in the blender or food processor - I used a potato masher and it works great. 

3.        Put the crushed fruit and water in a tall sauce pan. The jam will spit, so the tall pan will keep it in the pan and not all over your kitchen.

4.        Gradually stir in the no sugar needed fruit pectin into the fruit/water mixture. Bring to a boil over medium-high heat, stirring constantly. Once the mixture is at a boil, add the sugar and return to a boil. Boil hard for 1 minute, stirring constantly (and use oven mitts to protect your arms from spitting jam!). Remove from heat, then skim foam if desired (I never do).

5.        Take jars out of simmering water, one at a time and ladle hot jam into hot jars, leaving 1/4" headspace. Wipe the rims and threads of each jar with a clean, damp cloth. Center the heated lid on jar and screw band down until fingertip tight. Then place jar in canner and repeat with other jars.

6.        Once canner is full, add water if necessary to cover jars by 1 or 2 inches. Place lid on canner and bring water to a boil and lower heat until water stays at a gentle boil. Process according to times below (based on your current elevation).

Processing Times:
10 min (0-1,000 ft) 15 min (1,001-3,000 ft) 20 min (3,001-6,000 ft) 25 min (6,001-8,000) 30 min (8,001-10,000)

7.        After processing, turn off heat and remove the lid for 5 minutes before removing jars from the canner. Set the jars upright on a towel to cool for 12 to 24 hours. Once jars are cool, test jars for a seal by pressing the center of the lid. The lid should not flex up and down. If it does, immediately refrigerate or reprocess with a new lid for the full length of time. Clean jars and remove bands. Label and store in a cool, dry, dark place for up to one year.


We've enjoyed this jam on pancakes, waffles, rolls, bread or toast, bagels, or to sweeten plain yogurt. Lick the spoon and enjoy!

Wednesday, September 28, 2011

Got Pears? Canning Tips


Don't those look good? Yep, in spite of the spaghetti sauce disaster we're still canning like crazy around here. Here are some tips for canning pears in case you've got a few extra on your hands like we do...

A few things to consider are:
  • Always can ripe, mature fruit. If they taste bad fresh, they won't taste any better canned - in fact probably a lot worse.
  • An average of 17-1/2 pounds is needed per canner load of 7 quarts; an average of 11 pounds is needed per canner load of 9 pints. A bushel weighs 50 pounds and yields 16 to 25 quarts—an average of 2-1/2 pounds per quart.
Here's how I can pears. You can find the source here:

Pears - halved

Procedure: Wash and peal pears. Cut lengthwise in halves and remove core. To prevent discoloration, keep pears in an ascorbic acid solution (I use a dissolved 500 mg vitamin C tablet per gallon of water). Prepare fruit syrup. For a quart load I use 3-4 Cups of sugar to 8 cups of water. Or pack pears in water, apple juice, or white grape juice. They are not very good in water because the sugar in the pears leaks out into the water so you are left with not very sweet pears.

Hot pack Method (Raw packs make poor quality pears): In a large saucepan place drained fruit in syrup, water, or juice and bring to boil. Boil for about 5 minutes. Fill jars with hot fruit and cooking liquid, leaving 1/2-inch headspace. Place halves in layers, cut side down. Adjust lids and process according to times below (based on your current elevation).

Processing Times:
Hot Pints
20 min (0-1,000 ft) 25 min (1,001-3,000 ft)
30 min (3,001-6,000 ft) 35 min (Above 6,000 ft)
Hot Quarts
25 min (0-1,000 ft) 30 min (1,001-3,000 ft)
35 min (3,001-6,000 ft) 40 min (Above 6,000 ft)

Tuesday, October 5, 2010

Canning: Part 4 - Applesauce

Applesauce is not the easiest thing to can, but worth it if you have tons of apples. I love the fact that you can make very sweet applesauce that is so good it doesn't need any added sugar (at least I never add any). The quality of applesauce really depends on the quality of your apples and what kind you use. Some kinds are better than others. We really like Golden Delicious Apples for applesauce, but have used other kinds that are good too. Some varieties are better than others so try a couple to see what you like best - or better yet, try a mixture.

A few things to consider are:
  • About 21 pounds of apples makes a 7 quart canner load. An average of 13.5 pounds makes a 9 pint canner load. A bushel weighs 48 pounds and yields 14 to 19 quarts of applesauce.
  • For best results use apples that are sweet, juicy and crisp.
Here's the process for canning applesauce. The source for this is here.

Wash, peel, and core apples (with my food strainer, you don't need to peel or core them - saves a ton of time!). If desired, slice apples into water containing ascorbic acid (I use a dissolved 500 mg vitamin C tablet per gallon of water) to prevent browning.

Placed drained slices in an 8 to 10-quart pot. Add 1/2 cup water. Stirring occasionally to prevent burning, heat quickly until tender (5 to 20 minutes, depending on maturity and variety). I usually steam mine in a steamer for about 20 minutes or until very soft. Press through a sieve or food mill, or skip the pressing step if you prefer chunk-style sauce. I use the Roma food strainer:


Sometimes if the applesauce is really runny (from really juicy apples), I strain out some of the juice in the applesauce before canning with a really fine strainer and the kids love to drink it as apple cider (and the adults too).

Sauce may be packed without sugar. If desired, add 1/8 cup sugar per quart of sauce (it's really not necessary!). Taste and add more, if preferred. Reheat sauce to a rolling boil. Be careful because sauce splatters (I've got a few burns on my hands this year from splattering applesauce). Also it can burn on the bottom if heated too fast. I recommend heating it very slowly, stirring often and be very careful of the splatters. Fill jars with hot sauce, leaving 1/2-inch headspace (or more). Adjust lids and process according to times below (based on your current elevation).

Processing Times:
Hot Pints
15 min (0-1,000 ft) 20 min (1,001-3,000 ft)
20 min (3,001-6,000 ft) 25 min (Above 6,000 ft)
Hot Quarts
20 min (0-1,000 ft) 25 min (1,001-3,000 ft)
30 min (3,001-6,000 ft) 35 min (Above 6,000 ft)

Friday, October 1, 2010

Canning: Part 3 - Peaches

Mmmh....Home Canned Peaches! Doesn't that just make your mouth water? They are so much better than those you can get in the store. The only downside is the time it takes and the sticky kitchen! :)

A few things to consider are:
  • Always can ripe, mature fruit. If they taste bad fresh, they won't taste any better canned - in fact probably a lot worse.
  • An average of 17-1/ pounds is needed per canner load of 7 quarts; an average of 11 pounds is needed per canner load of 9 pints. A bushel weighs 48 pounds and yields 16 to 24 quarts—an average of 2-1/2 pounds per quart.
Here's how I can peaches. You can find the source here:

Peaches - halved or sliced

Procedure: Dip fruit in boiling water for 30 to 60 seconds until skins loosen. Dip quickly in cold water and slip off skins. Cut in half, remove pits and slice if desired. To prevent darkening, keep peeled fruit in ascorbic acid solution (I use a dissolved 500 mg vitamin C tablet per gallon of water). Prepare and boil a very light, light, or medium syrup (I use 8 cups of water and 3 to 4 cups sugar) or pack peaches in water, apple juice, or white grape juice. They are not very good in water because the sugar in the peaches leaks out into the water so you are left with not very sweet peaches.

Hot pack Method: In a large saucepan place drained fruit in syrup, water, or juice and bring to boil. Fill jars with hot fruit and cooking liquid, leaving 1/2-inch headspace. Place halves in layers, cut side down. Adjust lids and process according to times below (based on your current elevation).

Processing Times:
Hot Pints
20 min (0-1,000 ft) 25 min (1,001-3,000 ft)
30 min (3,001-6,000 ft) 35 min (Above 6,000 ft)
Hot Quarts
25 min (0-1,000 ft) 30 min (1,001-3,000 ft)
35 min (3,001-6,000 ft) 40 min (Above 6,000 ft)

Wednesday, September 29, 2010

Canning: Part 2 - Tomatoes

Tomatoes are some of my favorite things to can. They are relatively simple and fast (although the processing time is quite lengthy). Home canned tomatoes taste wonderful in soups and sauces all year long. When I can tomatoes I usually just can them as crushed tomatoes because it's a lot faster than boiling them down to make a tomato sauce or soup. The other benefit is you can add new spices and flavors and whatever vegetables you have on hand to the tomatoes, making a new tasting sauce each time. A few things to consider are:
  • Always can good quality fruit.
  • You need to add acidity to tomatoes if you are canning in a water bath canner (*see note below).
  • An average of 21 pounds is needed per canner load of 7 quarts; an average of
    13 pounds is needed per canner load of 9 pints.
Here's the recipe that I use; I got it here.
Crushed Tomatoes

Procedure: Wash tomatoes and dip in boiling water for 30 to 60 seconds or until skins split. Then dip in cold water, slip off skins, and remove cores. Trim off any bruised or discolored portions and quarter. Heat one-sixth of the quarters quickly in a large pot, crushing them with a wooden mallet or spoon as they are added to the pot to create juice. Continue heating remaining quartered tomatoes, stirring constantly. These remaining tomatoes do not need to be crushed. They will soften with heating and stirring. Continue until all tomatoes are added. Then boil gently 5 minutes. Add bottled lemon juice or citric acid to jars.*(see note below) Fill jars immediately with hot tomatoes, leaving 1/2-inch headspace. Adjust lids and process according to times below (based on your current elevation).

Processing Times:
Pints
35 min (0-1,000 ft) 40 min (1,001-3,000 ft)
45 min (3,001-6,000 ft) 50 min (Above 6,000 ft)
Quarts
45 min ((0-1,000 ft) 50 min (1,001-3,000 ft)
55 min (3,001-6,000 ft) 60 min (Above 6,000 ft)

* Acidity (Add acid directly to jars before filling. A small amount of sugar can be added to offset acid taste, if desired):
Pints: add 1/4 teaspoon citric acid or 1 tablespoon bottled lemon juice
Quarts: add 1/2 teaspoon citric acid or 2 tablespoons bottled lemon juice

Tuesday, September 28, 2010

Canning: Part 1 - Introduction

A few introductory tips on canning are necessary before you get started on this great adventure:

1) First, you need to know that home canning requires exactness or it could prove very dangerous to whomever eats the home-canned product. Be sure to follow recipes exactly or only change ingredients or quantities that are specifically mentioned as safe to alter. Never change processing times or weights or the results could prove hazardous to your health or the health of your loved ones.

2) These really aren't my recipes - You should never use a recipe for canning unless it has been tested by people who know what they are doing (a.k.a. ball blue book, your local extension service, etc). All of the basic measurements should come from them. You can usually add spices to the basic recipes, but again never change the main ingredients or processing times/pressures.

3) Canning times and pressure weights are based on elevation where you live. Make sure you google your town and find out what elevation you're at and follow the recipe accordingly.

4) For safety, canning lids should not be reused, but jars and bands are safe to reuse as long as they are still in good condition (with not cracks or chips in the jars).

5) If you follow the recipes exactly according and adjust times/pressure to your own elevation, home canning is very safe, and a great way to preserve your home grown produce. Canning can save money and is a great way to be frugal and prepare for the future.


There are two main types of canning: Water Bath Canning and Pressure Canning. Here are some basic instructions for each type:


Water Bath Canning
Water bath canning is the easier of the two types of canning and is generally used for high acid foods (foods with a pH of 4.6 or lower). Foods that are safe for water bath canning include most types of fruits, jams, jellies, fermented foods, and foods that have vinegar added to lower the pH such as tomatoes.

PACKING JARS
Typically jars are packed either hot or cold as specified in the recipe. Both methods require that the water in the canner be heated ahead of time and the jars be warm themselves. Hot pack typically refers to packing the hot jars with hot food and placing them in the hot canner. Cold pack refers to packing the hot jars with cold or blanched food, filling with hot liquid and placing them in the hot canner. The water in the boiling water canner must completely cover the jars and caps by 1 to 2 inches.

WATER BATH PROCESSING METHOD
Once the canner is full, place the lid on it and heat on high until water starts boiling rapidly. Once this happens, heat can be turned down to medium high and the time for processing begins (making sure to use the appropriate processing time for your current elevation). Once the processing time is complete, turn off the stove and remove the canner lid. Allow the jars to sit in the water bath for 5 minutes to cool slightly. Once the 5 minutes are up, remove the jars from the water bath canner and placed on a dish towel or rack (away from any cool draft) to cool completely. Jars should not be disturbed for 12-24 hours after removing from the canner in order to allow the lids to properly seal.

TESTING FOR SEALED JARS
After 12-24 hours undisturbed, the jar lids can be tested by pushing a finger directly in the center of the lid. If the lid moves slightly, it is not sealed. If it remains firm, it is sealed. Unsealed jars can be reprocessed (using the same method listed above - make sure to reheat contents separate for hot pack recipes) or refrigerated and eaten within a short period of time.

Pressure Canning
Pressure canning is necessary to use for low acid foods (foods with a pH above 4.6). These foods include vegetables, meats and seafoods. Also foods such as soups, stews, and sauces that have a combination of high and low acid foods also generally need to be canned using a pressure canner.

Pressure canning can be done with either a dial gauge or weighted gauge pressure canner. Pressure canners should be checked and tested often to ensure seals are safe and gauges are accurate before using them to can.

PACKING JARS
Jars should be packed the same way as specified in the water bath canning section except only 2 to 3 inches of heated water is needed in the canner. Usually the hot pack method of packing jars is preferred with pressure canned foods.

PRESSURE CANNING PROCESSING METHOD
Once the canner is full, lock the lid in pace. Leave weight off vent pipe (for weighted gauge pressure canner) or open petcock (for dial gauge pressure canner). Adjust the heat to medium-high until steam flows evenly from the vent pipe or petcock. Exhaust steam from the canner for 10 minutes. Then place the weight specified in the recipe on the vent pipe or close petcock (making sure to use the appropriate pressure weight for your current elevation). The canner should pressurize in about 5 minutes.

After gauge indicates recommended pounds of pressure have been reached, adjust the heat to maintain the pressure for the entire processing time. After the time is complete, turn off the heat. Allow the canner to cool naturally without adjusting pressure gauge at all. Once canner has depressurized, unlock lid and lift it off the canner base. Let the canner cool for 10 minutes before removing jars. Once the time is up, remove the jars from the canner and placed on a dish towel or rack (away from any cool draft) to cool completely. Jars should not be disturbed for 12-24 hours in order to allow the lids to properly seal. Test for sealed jars the same way as listed under the water bath canning instructions. Reprocess unsealed jars according to pressure canning processing method list above.

So that's it! If you made it this far, you are a champ. So go get canning!

Here's a couple of great sites with recipes:

http://www.uga.edu/nchfp/how/can_home.html

http://extension.usu.edu/htm/publications/by=category/category=319

And here's some of my favorite recipes that I've shared on this blog. Enjoy!

Thursday, June 24, 2010

A lot going on!

Well I think it's finally summer here! It's been the strangest spring - unusually cold and wet, so I'm excited that things are finally warming up. We've been picking peas this week - today I pick a huge bucket full! Fresh peas, yum! Here's some pics of our garden right now:

This shows the corn - we planted 3 rows at first and then 3 more rows two weeks later. We staggered it so we don't have all of our corn coming on all at once.


Everything is growing nicely!

We built a little fenced-in yard for the chickens:
They just fly right over the fence and come poop on our porch. The black and orange one should be called "Houdini" - it even manages to get out of the coop when the door is latched and everything! I haven't seen how it does it yet. I think I'm about ready to clip their wings.

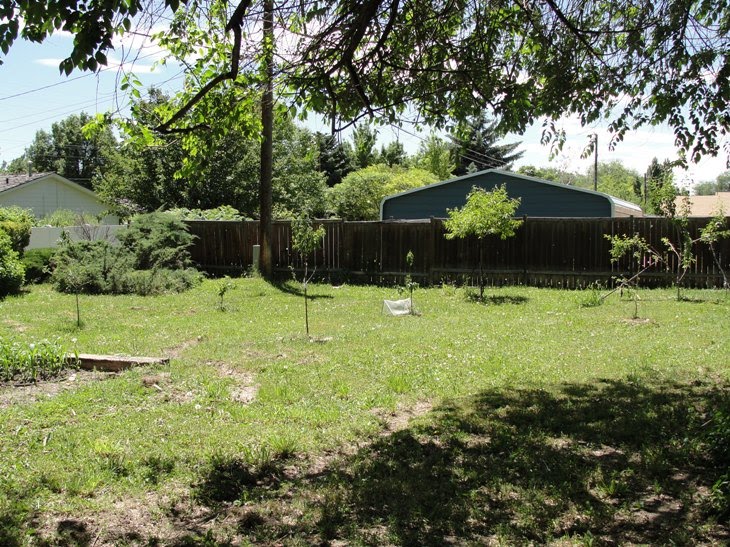
I don't think I've ever posted a picture of our new orchard that we planted:
Some of the trees are bigger than others. The 3 larger trees near the brown fence we planted 3 years ago. The other 5 trees we planted in November of last year. We have a total of 4 peach trees, 3 pear trees and 2 apples (there is another pear tree planted up near the front yard). We have about 6-8 peaches on the largest tree that you see in the picture! We're excited to get a few peaches this year!

I spent the day yesterday canning beans:


What a job! But they are yummy! And it's nice having several bottles on hand for when I need a "quick meal!"

Our flowers are beautiful right now - This is our Clematis - isn't it gorgeous?Our rose bushes have never looked better - they loved the extra rain they got this year and I fed them a little better as well!
And finally here is the newest member of our family - meet Cheep-y! Curious George named it - it is a sweet little fellow.
It's good to have another little pet for the boys to love!

Wednesday, April 8, 2009

Canning Dry Beans - Pinto, Kidney, etc.

Last week was a busy week, but I decided to add to my busyness by canning a batch of pinto beans. :) I ran out of canned beans and I love having them on hand. I've posted about pressure cookers - I cook a lot of beans in my pressure cooker and it is really nice to be able to cook them from start to finish in about an hour for most beans (including soaking). Some days, however, the pressure cooker is still not fast enough for me. I love having some jars of canned beans on hand that I can just open and pop in a recipe. I could buy the canned beans, but I've decided to can my own, mainly for the experience but also because I store dry beans that I like to rotate.

Ask your local extension service how to can dry beans for your altitude. I pre-soak them for 12-18 hours and then cook them for 30 min. I then hot-pack them into hot quart jars leaving 1 inch headspace and pressure can them for 1 hour 30 min at 15 lbs. pressure. They turn out wonderful - very tender. Remember to make sure you follow canning recipes that are tested for your altitude exactly. To ensure safety, only use recipes that are verified by your state extension service.

Just FYI, two #10 cans of pinto beans (about 10 lbs.) made 19 qts. of canned beans. It took me the good part of a day, so plan on doing it when you have a lot of time! Here's some pictures:

Thursday, October 30, 2008

Roma Strainer Review

My husband bought me a Roma Strainer for my birthday recently. I love it! Making applesauce is a breeze with this awesome kitchen gadget. It's not what I'd term a necessity, but for homemade applesauce or tomato sauce makers it is definitely a good investment. It's easy to use and speeds up the processing time by hours!

The only drawback I have with the strainer so far is that is has a lot of small parts that are hard to keep track of. Like this morning for instance, my husband was washing the dishes. When he ran the garbage disposal, there was this awful grinding noise. He quickly stopped it and looked inside. To his dismay, there was a small rubber gasket from the brand-new Roma Strainer he had bought me clogged in the disposal. When he pulled it out, it was all chewed up. Oh well, at least they make replacement parts!

Popular Posts

LinkWithin

Related Posts with Thumbnails