Showing posts with label Salads. Show all posts

Tuesday, January 20, 2015

Winter Honey-Lime Fruit Salad


We had some friends over for dinner the other night. They expressed a desire not to have a sugary dessert served so I thought instead I would serve this honey-lime fruit salad. They loved it and asked about the "zesty" flavor. I told them about the secret - the lime (or lemon) juice dressing. It really brings out the flavor of the fruit and turns it into something really special.

I call it "Winter honey-lime fruit salad" but I've made it other times of the year also. The winter fruits (like apples and mandarin oranges) really shine out in this salad, but you could easily use peaches and pears for a summer version. Strawberries happened to be on sale the week I made this so I included those and I love the color they add. You could also use kiwis, blueberries, or raspberries. Obviously if you were in a pinch, you could use canned pineapple instead of fresh, but I wouldn't recommend it unless you're really in a bind. The fresh pineapple adds something wonderful.

I'm always looking for ways to brighten up winter days this time of the year and this colorful fruit salad is sure to do the trick. On top of that, it's healthy and delicious. A win all around.


Winter Honey-Lime Fruit Salad
Printable Recipe

*Makes 6 1-cup servings

INGREDIENTS:
6 Cups Fruit, cut into bite sized pieces (I used 1/4 sliced fresh pineapple, 1/2 lb. sliced strawberries, 3-4 chopped fresh mandarin oranges, 1 chopped golden delicious apple)
Juice of 1-1/2 limes or 1 lemon
2 heaping Tbsp. honey

DIRECTIONS:
Wash and chop up fruit into bite sized pieces and place in large bowl. Soften honey (if not already soft). For best results it should be a runny consistency. In a small bowl whisk together lime (or lemon) juice and runny honey. Pour over chopped fruit. Serve immediately or chill for up to 2-3 hours before serving. Best served the same day, if made too far in advance, fruit may get a little soggy.

Recipe Source: healthyfamilycookin.blogspot.com


Thursday, October 23, 2014

Spinach Salad with Tangy Poppy Seed Vinaigrette


We had a family reunion this summer with Brandon's family. His cousin's wife brought this salad. Once I tasted it, I immediately forgot about all the other food that was being served and had seconds and thirds of this salad. It is SO good. Vanessa was kind enough to share the recipe with me and agree to let me share it with you.

I dream about this salad. Yes that is a confession. I feel better getting it out in the open. Not many salads capture my heart so totally and completely like this one has.

I adapted it to be sugar free using raw honey as a substitute. If you don't like mushrooms, leave them out or substitute them with something like a sliced red bell pepper. I understand. I'm actually a newly converted mushroom liker. Yes liker, not lover. Me and mushrooms used to not get a long aaaaat all, but now I'll put up with them (and maybe even enjoy them once and a while).

So for me to put up with mushrooms in a salad that I dream about...Well that's saying something.


Spinach Salad with Tangy Poppy Seed Vinaigrette
Printable Recipe

INGREDIENTS:
1 large head Romaine Lettuce, washed and chopped
6 oz. spinach leaves, washed
3/4 lb. sliced mushrooms
1/3 Cup finely chopped red onion
1/2 lb. cooked and crumbled bacon
2 11-oz. cans mandarin oranges, drained
1/2 Cup slivered almonds, candy coated*
3/4 lb Swiss cheese, grated or finely sliced

DRESSING INGREDIENTS:
1-1/2 tsp. poppy seeds
3/4 Cup canola oil
1/4 Cup onion (I usually just use a half of a small yellow onion)
2 level Tbsp. prepared mustard
1/3 Cup white vinegar
1/3 Cup white sugar or raw honey (I use honey)
3/4 tsp. salt

DIRECTIONS:
Prepare salad dressing by combining salad dressing ingredients in a blender and blending well. Refrigerate for at least an hour or up to a week before serving. In a large salad bowl combine chopped lettuce, spinach leaves, mushrooms and chopped red onion. Cover and refrigerate until ready to serve. Just before serving, add the mandarin oranges, crumbled bacon, candy coated slivered almonds, and grated Swiss cheese. Serve dressing on the side, or add to taste (you may not use it all). When I serve this for my family (as a main dish salad), I like to leave the mandarin oranges, the crumbled bacon, the candy coated slivered almonds, the Swiss cheese, and the dressing separate so my kids can add them to their liking. It also works better for leftovers if they are not already combined.

*I adapted this recipe to candy coat with honey according to the directions found in this previous post, but the original recipe called for candy coating with sugar. To candy coat with sugar, melt 3 Tbsp. sugar in heavy bottomed saute pan. Add 1/2 Cup almonds and coat with melted sugar. Separate and cool.

Recipe Source: Adapted from a recipe shared with me by Vanessa

Tuesday, October 21, 2014

Honey Candy Coated Almonds

I love sweets. With a passion. Like in a bad way. I must have a mouth full of sweet teeth I guess. These honey candy coated almonds are a new discovery for me, but I really couldn't not share them with you. That would be like denying you of one of the important things in life that is making me happy right now. I know this recipe calls for 1/2 Cup almonds, but I'm telling you right now that's not going to be near enough. Feel free to double or triple or quadruple the recipe to your heart's content. I love making this recipe with either slivered or whole almonds. When candy coated, the whole almonds make a yummy snack. And the candy coated slivered almonds are my favorite for salads, but to be honest I usually shove handfuls in my mouth so there's not much left for a salad when I'm done.


Honey Candy Coated Almonds
Printable Recipe

INGREDIENTS:
1 Tbsp. honey
1/2 Cup slivered or whole almonds
1/4 tsp. sea salt

DIRECTIONS:
In heavy duty (thick bottom) frying pan, melt 1 Tbsp. honey over medium-low heat. Add 1/2 Cup slivered or whole almonds. Stir until almonds are well coated with honey. Keep almonds in single layer in pan as much as possible. Stir often at first and then constantly towards the end of cooking time to prevent almonds from burning. Heat for 10-15 minutes over medium-low heat until almonds have darkened in color and honey has thickened (slivered almonds should turn golden brown, whole almonds will turn deep brown). Sprinkle 1/4 tsp. sea salt over almonds and stir well. Turn off heat and set aside pan to let almonds cool for 5 minutes in pan. Place almonds on wax or parchment paper separated from each other in a single layer until completely cool. Once completely cooled, stored in a sealed container. Use as a snack or salad topping.

Recipe Source: healthyfamilycookin.blogspot.com


Tuesday, October 7, 2014

Kefir Ranch Dressing or Veggie Dip


Have you jumped on the kefir bandwagon and discovered all of the amazing things you can use it in? We love these kefir smoothies, and consume them on an almost daily basis, but there's so much more to use kefir in! With our garden still producing like crazy, I sliced up some fresh vegetables and whipped up a batch of this yummy kefir veggie dip for my kid's after-school-snack. And yes all of the veggies shown in these pictures are from our garden (except the olives of course). What a great way to get your probiotics found in the kefir and all of the wonderful nutrients from the fresh vegetables.

Have you tried kefir yet? 
What have you made with it? 

Kefir Ranch Dressing or Veggie Dip

*Makes about 1 Cup

INGREDIENTS:
1/2 Cup mayonnaise
1/2 Cup kefir milk (or buttermilk if you don't have kefir)
1 Tbsp. freshly chopped parsley (or 1 tsp. dried)
1-1/2 tsp. freshly chopped onion (or 1/2 tsp. onion powder)
1 clove garlic, finely minced (or 1/2 tsp. granulated garlic)
1 tsp. freshly chopped dill weed (or 1/4 tsp. dried)
1/4 tsp. freshly ground black pepper
1/4 tsp. salt

DIRECTIONS:
Add all ingredients to a small bowl and whisk until smooth. Alternately you can pulse for a few times in a blender. Refrigerate for 2 hours or up to a week until ready to serve. Serve as a salad dressing or as a dip with fresh vegetables. 

Recipe Source: healthyfamilycookin.blogspot.com

Tuesday, March 18, 2014

Spinach Strawberry Salad with Zesty Honey Vinaigrette

I love spring. So many things to love about it. My crocuses and daffodils are blooming right now. Makes me so happy to look outside and see them. Soon maybe I'll see a few tulips if the deer don't get to them first. They already nibbled on a few. I still haven't gotten out to plant my spring garden yet. I'm running a bit behind this year. Our remodel project is close to being done and we're really pushing to try to finish it in the next couple of weeks. That project has put the garden off a few weeks, but hopefully we'll get to it soon.

One thing I love about spring are spring fruits and vegetables. Isn't it interesting how your body is hungry for certain foods during certain times of the year? Well this time of year my body is hungry for spring salads and tender spring vegetables and fruits. Mmmmh...I love how this salad combines fruit and vegetables into an amazingly beautiful and delectable appetizer. It's a perfect salad for my liking. Simple enough for everyday, but fancy enough to bring to a potluck or share with guests. It's very easily adaptable too. I think it would be fabulous with raspberries, blackberries or blueberries instead of (or in addition to) strawberries. That would be wonderful for later on in the summer when those fruits are available. Add some toasted slivered or sliced almonds for a bit more crunch. Some cooked or popped quinoa sprinkled on top would be amazing. Oh and can I even mention bacon here? This is a healthy food blog, but this salad is screaming bacon bits to me (real ones of course). I may just have to try it and let you know. Or not let you know if you prefer it that way. Anyway, I kept the recipe simple here for simplicity's sake, but feel free to dress it up to it to your heart's
content.


Spinach Strawberry Salad with Zesty Honey Vinaigrette
Printable Recipe

INGREDIENTS:
12 oz. fresh baby spinach
1 qt. fresh strawberries, sliced
2 Tbsp. sesame seeds
1 Tbsp. poppy seeds
other optional toppings (not pictured): slivered or sliced almonds, toasted; real bacon bits; cooked or popped quinoa

DRESSING INGREDIENTS:
1/2 Cup canola oil
1/2 Cup raw honey
1-1/2 tsp. grated yellow onion
1/4 tsp. Worcestershire sauce
1/4 tsp. paprika
1/4 Cup apple cider vinegar

DIRECTIONS:
Layer spinach, strawberries, sesame seeds, poppy seeds and any desired optional toppings in a large salad bowl. Combine the dressing ingredients in a jar with a tight fitting lid or blender. Shake or blend until thoroughly combined. Let sit at room temperature for twenty to thirty minutes to blend flavors. Just before serving pour the dressing over the spinach and toss lightly to coat the spinach and berries.

*Note: If you don't want to make the entire salad. Just layer a salad plate with spinach, then strawberries, then sprinkle with seeds and desired optional toppings. Then pour on desired amount of dressing and enjoy! Makes a quick and delicious lunch. 

*Note 2 (yeah a lot of notes I know...): An easy way to make this would be to make the dressing ahead of time. If it's several hours early (or a few days), just refrigerate the dressing after making. Then 20-30 minutes before serving allow the dressing to come to room temperature before serving.

Recipe Source: healthyfamilycookin.blogspot.com

Tuesday, April 9, 2013

Perfect Potato Salad with Quinoa

I had a wonderful time with my family over spring break, but it sure is good to be back home and back to normal life and a regular schedule again. One of the things I missed the most was eating healthy, home cooked meals. It gets harder and harder to eat processed-white-flour-packed-foods when your body is used to the flavor and nutrition of grains. But even after just three days of home cooked meals again I'm starting to feel back to my normal self.

One thing that I've discovered that I love about cooking from scratch is that you can change a recipe up to make it healthier with very little effort and without sacrificing any of the original recipe's deliciousness. This potato salad is a great example of this. I added cooked white quinoa to the salad, thus upping the nutrition by a lot because white quinoa is a perfect protein and very healthy (If you're interested in learning more about it, I devoted a whole post to white quinoa last year). White quinoa is the perfect grain to disguise in potato salad because it blends in so well and no one will even know it's there.

I'm excited to share with you this recipe that you can make in your pressure cooker. I wrote this recipe up for the pressure cooker, but don't worry if you don't have one, you can still cook all the ingredients on the stove and combine them to make a very delicious potato salad. Spring is here (despite the snow I woke up to this morning) and summer is close on it's way! This is a delicious recipe that you can serve with a barbecue or picnic this spring or summer. I brought it to a barbecue my family had over Easter weekend and everyone loved it. Enjoy.


Perfect Potato Salad with Quinoa
Printable Recipe

*Serves 10-12
*This is a pressure cooker version of the recipe, but you can easily make it without a pressure cooker by cooking the white quinoa, potatoes and hard boiled eggs on the stove. 

INGREDIENTS:
Salad:
10 eggs
1/2 Cup white quinoa
5 lbs. potatoes (I used about 10 large Russets, but you can use other varieties)
1 Cup sliced olives

Dressing:
2 Cups mayonnaise (Light mayo works fine)
2/3 Cup buttermilk
1 1/2 tsp. dried parsley
1 tsp. salt
1 1/2 tsp. minced dried onions
1 1/2 tsp. garlic salt
1 tsp. seasoned salt
1 tsp. ground black pepper
2 Tbsp. yellow mustard

DIRECTIONS:
Hard boiled eggs (this step can be done ahead of time):
I like to hard boil my eggs according to this method in the pressure cooker because the eggs are easy to peel and come out perfect every time. Place the metal trivet that comes with the pressure cooker on the bottom of the pressure cooker. Add about a cup of water and place a few canning lids on the trivet (this is to keep the eggs from bumping into each other, but you may not need very many since you will be cooking 10 eggs). Arrange the eggs in and around the lids. Heat up the pressure cooker until it reaches low pressure and then cook for 6 minutes. Allow the pressure to go down naturally and then immediately remove the eggs and cool them in ice water to stop the cooking process. Let pressure release naturally and then cool and refrigerate the eggs. 

Cooked Quinoa (this step can be done ahead of time):
Add 1/2 Cup white quinoa to the pressure cooker along with 1 Cup of water. Pressure on high for 6 minutes, then do a quick release. Cool and refrigerate. 

Potatoes (this step can be done ahead of time):
Peel the potatoes and place on top of metal trivet in pressure cooker. Add 2 Cups of water to cooker, lock the lid in place and cook on high pressure for 6 minutes. Naturally release the pressure, then cool and refrigerate potatoes.

For the salad, dice the cooked potatoes into bite sized pieces and add to a large serving bowl. Dice the hard boiled eggs and combine with the potatoes. Add to the bowl the chopped olives and the cooked and cooled quinoa. Then toss potato salad ingredients together until evenly distributed. Combine the dressing ingredients in a quart sized canning jar or a blender and shake or blend until combined. Pour dressing onto potato salad until the correct consistency is found. Refrigerate potato salad at least 2 hours to combine flavors or until ready to serve.

Recipe Source: Adapted from Mel's Kitchen Cafe


This week I'll be linking to some of these link parties.

Monday, May 21, 2012

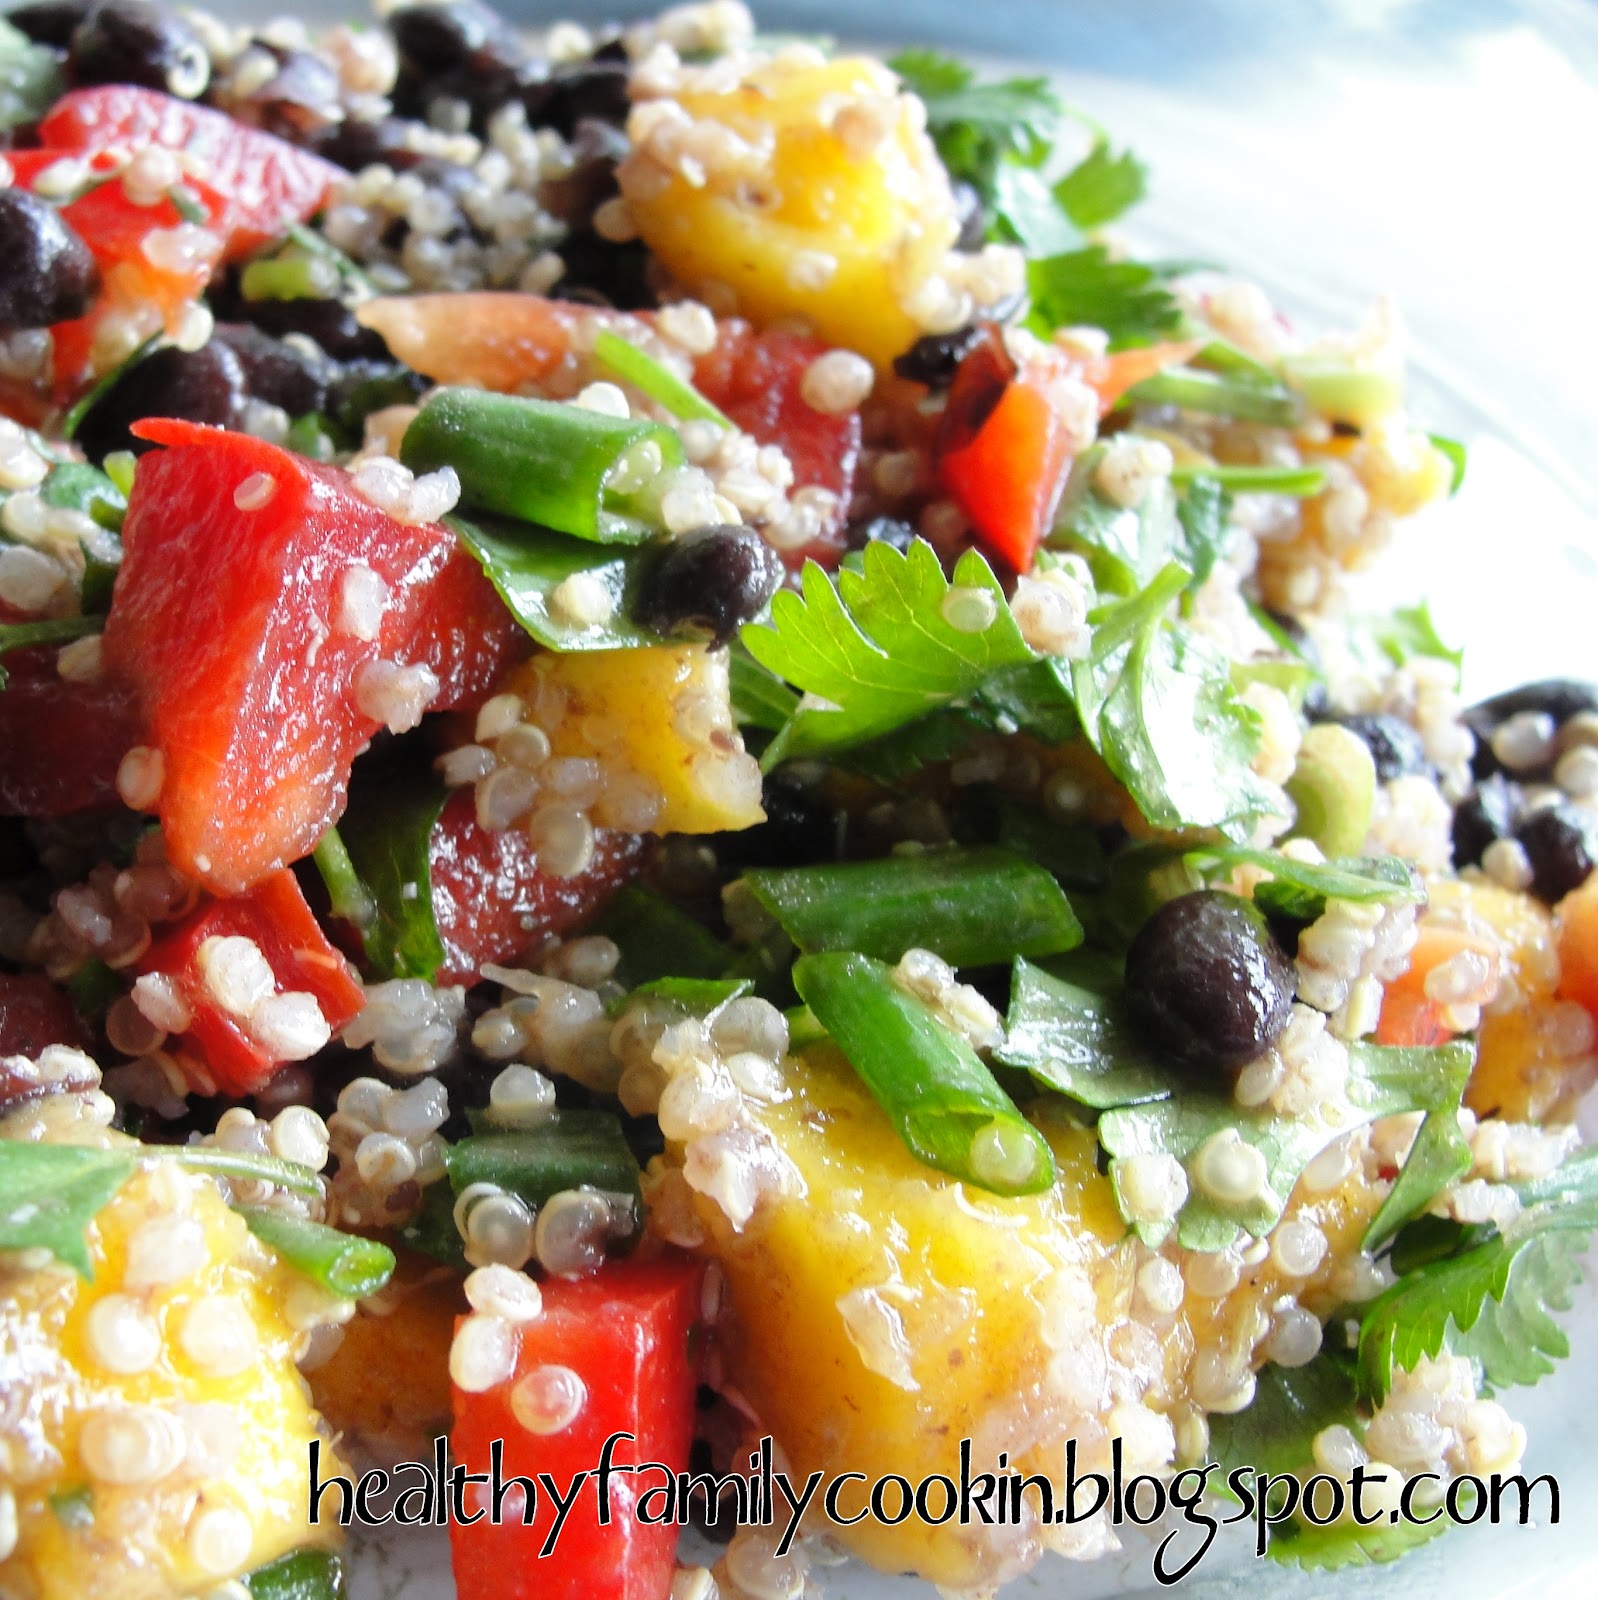
Black Bean Mango Salad

We're still talking about black beans this week and today I'm going to share with you a recipe that combines black beans with white quinoa in a wonderful, fresh, and delicious salad. Perfect for a light lunch or a BBQ or other side dish. 


Black Bean Mango Salad
Printable Recipe

*Note: Red quinoa would be delicious in this recipe too!

INGREDIENTS:
1/2 Cup white quinoa, uncooked (or use 2 cups cooked and chilled quinoa)
2 Cups cooked and chilled black beans (or 1 14 oz. can, drained and rinsed)
1 mango, peeled and chopped
1 red bell pepper, chopped
6 green onions, chopped
1/2 Cup chopped cilantro, or more to taste

Dressing:
4 Tbsp. red wine vinegar
3 Tbsp. extra virgin olive oil
1-2 Tbsp. fresh lime juice (about 1 lime)
kosher salt
freshly cracked black pepper

DIRECTIONS:
Put 1/2 Cup quinoa in saucepan and add 1 cup water (or chicken broth). Heat on medium high until water starts to boil. Turn down heat to medium low, put a lid loosely on the pan and simmer for 20 minutes or until water is dissolved and quinoa is cooked. Remove quinoa to a large bowl and put in the refrigerator for an hour or two until quinoa is chilled.

When quinoa is chilled add to the bowl black beans, chopped mango, red pepper, green onions, and cilantro. In a separate bowl, combine red wine vinegar, olive oil, and lime juice. Whisk together until it reaches a smooth consistency, then pour in the large bowl on top of the salad ingredients. Toss to combine and add salt and pepper to taste. Chill for at least one hour before serving. Delicious for a BBQ side dish or serve with bread or rolls for a lunch. Enjoy!

Recipe Source: adapted from ourbestbites.com

Wednesday, February 22, 2012

Etiquette Dinner

We had quite a fun experience last night teaching three teenage boys to cook. My husband works with the young men in our church group ages 12 - 18. Last night they were having an etiquette dinner at 6 p.m. with the young women where they learned manners, etc. The young men were in charge of cooking dinner so they met at our house at 4 p.m. to make this dinner:

- A spinach salad (with roasted almonds) - see recipe below
- Bread sticks
- Chocolate Lush Dessert

Some of the other boys were making chicken stroganoff at another home for the main dish. They made enough food to feed 36 people with some leftovers. I was so impressed with the boys and what they were able to accomplish in only 2 hours. The food was beautiful and tasty and they had a lot of fun doing it. We only had one mishap with a pan of roasted almonds, but I was so impressed with how they cleaned it right up and we still had plenty of almonds for the salad.

These recipes are really simple and perfect for cooking with your kids!


Roasted Almond Spinach Salad 
Printable Recipe

*Serves 8-10

1 10-oz. package fresh spinach
1 red bell pepper, chopped
3/4 Cup dried cranberries
1 Cup 
roasted, slivered almonds
raspberry vinaigrette dressing (to taste)

Combine all ingredients and toss. Serve immediately.


Isn't it colorful? This picture is taken without the roasted almonds and the dressing. They added those just before serving.

We made three batches of this Chocolate Lush dessert:


Chocolate Lush

*Serves 12-15

*Note: This dessert is put together in 4 layers.

2 Cups Flour
3/4 Cups butter
1 Cup chopped walnuts
1 8-oz. pkg. cream cheese
1 Cup powdered sugar
1 8-oz. Carton Cool Whip, divided
1 small package instant chocolate pudding
1 small package instant vanilla pudding
3 Cup milk (whole is best)

Crust Layer:
Mix together 2 Cups flour, 3/4 Cup butter and 1 Cup walnuts with a fork. Spread in a 9 x 13" ungreased pan. Bake 15 minutes at 350 degrees. Let cool completely before adding the next two layers.

Cream Cheese Layer:
Mix together 1 8-oz. pkg. cream cheese, 1 Cup powdered sugar and 1 Cup Cool Whip in a bowl with an electric mixer. Spread layer of cooled crust.

Pudding layer:
Put 1 small package chocolate pudding, 1 small package vanilla pudding and 3 Cup milk in a large bowl. Using an electric mixer, beat on high for 3 minutes, scraping the sides of the bowl often. Then spread pudding mix on top of cream cheese layer.

Cool Whip Layer:
Spread the remaining Cool Whip onto the top of the pudding layer. Sprinkle with chopped nuts, if desired, chocolate sprinkles, or a grated chocolate bar.

Then chill until serving.

Variations:
You can also use another kind of pudding in place of the chocolate. For example Lemon Lush would use 1 pkg. Lemon Pudding, Butterscotch Lush would use 1 pkg. butterscotch pudding, Pistachio Lush would use 1 pkg. pistachio pudding.


Finally, we made three batches of bread sticks. Here's the recipe. Make LOTS! Nobody can eat just one! *Note: Sometimes for our family I make them whole wheat. Click here for the whole wheat recipe. 
Bread Sticks after Raising


Bread Sticks
Printable Recipe

*Makes about 24 breadsticks

1 1/2 Cups Water
1 tsp. salt 
1 Tbsp. powdered milk
1 Tbsp. honey or brown sugar
1-1/2 Cups Freshly-ground Wheat flour
3-4 Cups Unbleached White Flour
1 Tbsp. SAF instant yeast 
1/4 Cup melted butter

Heat water in the microwave for 1-1/2 minutes or until hotter than 110 F. Then add water, salt, milk, and sugar in Bosch mixer. Add 1-1/2 Cup wheat flour. Then add the yeast on top. Set mixer at 2nd speed and mix adding the white flour until barely begins to pull from sides (you may not need all of it). Mix to let gluten work in for about 6 min.

Roll the dough into "snakes" to the size that you desire. Brush tops with 1/4 Cup melted butter, and sprinkle with any topping such as garlic or onion salt, parmesan cheese, sesame or poppy seeds, or seasoned salt. Allow to rise 15-20 minutes. Bake at 400 degrees about 10-15 minutes. They are great dipped or spread with butter as you eat them.

*Note: People eat a lot of these so always make more than you think!


Cooked Bread Sticks - Don't they look professional?


Here they are doing the dishes afterwards! What a fun evening and what a great bunch of kids!

Thursday, June 30, 2011

Asian Rice Salad with Broiled Tilapia

Well I've been cooking a lot lately, but haven't had much time to blog about the finds I've made. Here's an asian rice salad that I found on this site that is great!

Sorry my picture is a bit blurry...We served the rice salad on a bed of lettuce fresh from our garden (don't mix the lettuce in - just put on plate and scoop salad on top and broiled tilapia. Yum.

Broiled Almond-Crusted Tilapia
Printable Recipe

*4 light servings

INGREDIENTS:
4 4-oz. tilapia fillets
1/4 Cup butter, melted
Seasoning salt
1/2 Cup ground almonds (pulsed in a blender)

DIRECTIONS:
Preheat Broiler. Place tilipia fillets on a broiling pan or cookie sheet. Spread with melted butter. Sprinkle with seasoning salt, to taste and ground up almonds. Broil for 6 minutes or until tilipia is tender and flakes easily with a fork.

Recipe Source: healthyfamilycookin.blogspot.com

Thursday, June 9, 2011

The BEST Mexican Black Bean Taco Salad

Oh my goodness! I have eaten this dish 3 times this week and it is soooo good! I think it just get's better and better. I made it one night for dinner and have had leftovers for lunch twice. I've made the black beans before, but with this combination, wow - this is an out-of-this world dinner - one of my most favorites of all time. The nice thing about it is it is vegetarian, easily vegan, gluten-free, and....tasty!

I'm posting this as a surprise for my Dad for Father's day. My Dad's diet is gluten-free, low-fat, low sodium, and a ton of other restrictions that I probably missed. As you can probably guess, he eats pretty bland food. For my Dad, I'm having him try the recipe below with a few changes: leaving out the salt, using fat-free or low fat mayo in the dressing and using the healthier tortilla chips with little or no salt or leaving out the chips all together.

Mexican Black Bean Taco Salad
Mexican Black Beans
Corn (canned or frozen), warmed
Lettuce, chopped
Tomatoes, diced
Avacados, chopped (optional)
Tortilla Chips
Cheese (optional)
Other salad veggies as desired (Cabbage, green onions, cucumbers, bell peppers, etc)
fresh limes, sliced into wedges (You've GOT TO USE FRESH LIMES!! A MUST!!)
Cilantro-lime buttermilk dressing (see recipe below, leave off for vegan or make a variation using vegan substitutes)

Prepare the ingredients and place in individual serving bowls on the table. Each person can prepare their own salad as desired. I like to layer chips, black beans, corn, lettuce, tomatoes, avacadoes, cheese and other veggies on my plate. Then I squeeze the lime juice all over and pour on the dressing. I like to either eat as a salad or dip chips into it for a dip.

Cilantro-lime Buttermilk Dressing
¾ C. Mayonnaise
1 Tbsp. Freshly squeezed lime juice
1 tsp. Ground black pepper
¾ tsp. fresh oregano, minced or ¼ tsp. dried
½ tsp. salt
½ C. buttermilk
2-3 Tbsp. fresh cilantro, minced (or more, as desired)
1 tsp. fresh garlic, minced
½ tsp. onion, minced

Mix all the ingredients in a blender. Use immediately or store in a tightly covered container and refrigerate up to 1 week. Shake well before using.

Wednesday, February 2, 2011

Whole Wheat Pita Bread

This recipe for Pita Bread is delicious! Enjoy...

Whole-Wheat Pita Bread
Printable Recipe

*Makes 8 (6-inch) pita loaves.

INGREDIENTS:
1 tsp. honey
1/4 C. extra-virgin olive oil
1 tsp. salt
1 1/4 cups warm water (105–115°F)
3 cups whole wheat flour (can use a mixture of milled flax, bran)
3 Tbsp. vital wheat Gluten
2 1/2 tsp. active dry yeast
Could add thyme, or sesame to dough
Cornmeal for sprinkling baking sheet.

DIRECTIONS:
Put in the first 7 ingredients in Bosch mixer in order. Note this is very important - and make sure your water is very warm (put it in the microwave for a bit). Add any additional flour if needed. Mix with mixer for about 6 mins.

Form dough into a ball and put in an oiled large bowl, turning to coat. Cover bowl with plastic wrap and let dough rise in draft-free place at warm room temperature until doubled in bulk, about 1 hour.

Punch down dough and cut into 8 pieces. Form each piece into a ball. Flatten 1 ball, then roll out into a 6 1/2- to 7-inch round on floured surface with a floured rolling pin. Transfer round to 1 of 2 baking sheets lightly sprinkled with cornmeal. Make 7 more rounds in same manner, arranging them on baking sheets. Loosely cover pitas with 2 clean kitchen towels (not terry cloth) and let stand at room temperature 30 minutes.

Set oven rack in lower third of oven and remove other racks. Preheat oven to 500°F.

Transfer 4 pitas, 1 at a time, directly onto oven rack. Bake until just puffed and pale golden, about 2 minutes. Turn over with tongs and bake 1 minute more. Cool pitas on a cooling rack 2 minutes, then stack and wrap loosely in a kitchen towel to keep pitas warm. Bake remaining 4 pitas in same manner. Serve warm.

*Recipe Source: healthyfamilycookin.blogspot.com

Wednesday, January 19, 2011

Delicious, Delicious, Delicious Rice Salad

I read about Josey's Rice salad a while ago, but today I made it for lunch. Oh my - I'll definitely be making it again - Ssoooooo Yummmy!!! It's very filling and has simple ingredients. My kind of recipe. We're trying to eat healthier - more veggies, less sweets, more whole-grains. This kind of salad is perfect for that kind of diet because it add interesting flavor and texture to a basic grain and veggies.


Josey’s Rice Salade

*Serves 4

INGREDIENTS:
2 cups cooked and chilled brown rice (about 1 cup uncooked brown rice, cooked and chilled)
1 cup corn kernels (canned or frozen, unthawed)
1/4 cup black olives, sliced
1 stalk celery, sliced thinly
2 green onions, sliced thinly or 1/4 cup red onion, diced
3 boiled eggs, peeled and sliced
5 small tomatoes, chopped or 1-1/2 cups cherry tomatoes, halved
5 leaves of romaine lettuce, torn into bite-size pieces

French Dressing
3 tablespoons olive oil
2 tablespoons apple cider vinegar
1 teaspoons salt
Freshly ground black pepper

DIRECTIONS:
Combine French dressing ingredients in a large salad bowl. Stir in chilled rice, corn, celery, onions and egg slices. Refrigerate until serving (best chilled for at least an hour). Serve salad on a bed of romaine lettuce and sprinkle tomatoes on top.

Recipe Source: Adapted from homeschooling.net

Tuesday, July 21, 2009

The Taste of Summer

I don't know about you, but I love to eat light foods in the summer. We love to grow a garden and eat the vegetables from it all summer long. Our garden is just starting to produce the summer vegetables. We've had a few summer squash and zucchini, a couple of cucumbers, some beans and plenty of fresh chard. Usually the chard is the hardest to stay on top of in the summer. When it's not regularly picked, it grows large and tastes rather bitter. I know a lot of people love fresh chard cooked with butter and salt on it. We actually prefer it raw and we use it exclusively in our salads in the summer (when the spinach and leaf lettuce has gone to seed). The nice thing about swiss chard is that it will produce even in the heat of summer. It's a great vegetable to grow and very healthy! As long as it's kept young and tender chard is a great substitute for spinach in salad recipes. Here's a delicious recipe with chard that I adapted from this recipe I found.

Spinach or Chard Rice Salad
1/2 cup Italian salad dressing (I used half of a package of dry Italian dressing and the ingredients to make it)
1 tablespoon soy sauce
1/2 teaspoon sugar
2 cups cooked brown rice
1 large green bell pepper*
4 green onions, thinly sliced
2 cups thinly sliced fresh spinach
5 bacon strips, cooked crisp and crumbled (optional - I didn't use)

*This recipe would also be very good with other vegetables. A few ideas are: sugar snap peas, red bell pepper, celery or olives.

We had this for dinner tonight with crescent rolls and fruit salad. Yum! The taste of summer really doesn't get much better than that! Here's the crescent roll recipe I adapted it from this blog recipe - these were AMAZING! Mine didn't poof up as much as hers probably because I got impatient and didn't let them rise quite as long, but they were still really really good.

Crescent Rolls
(makes 2 cookie sheets, 48 rolls, 24 on each pan)

4 T. yeast
½ c. + 2 T. warm Water
6 eggs
1 c. oil
1 c. sugar
2 c. warm milk (not scalding)
2 T. salt
4 C. of wonder flour
4 Tbsp. of Gluten flour

Mix together in large bosch mixer (I halved this recipe for my compact Bosch) and add:

6-7 c. white flour a cup at a time until dough pulls away from sides of bowl

Continue to mix/knead for 5 minutes on med-high speed. Allow to raise 2-3 hours.

Separate dough into 6 even balls. Roll out each ball until the size of a dinner plate on a lightly floured surface. Cut into 8 pizza wedge slices. With each wedge, roll down ward wrapping bottom skinny bottom piece down and around to make pretty crescent shape. Place 3 rolls across and 8 down, 24 on each cookie sheet.

Allow to double in size while covered with clean dish towel (about 15 minutes). While raising on top of oven, preheat the oven to 400 degrees. Bake one sheet at a time. Bake 6 minutes on bottom rack and then 5 minutes on middle shelf until light golden brown. (Before you take them out, double check the bottom to make sure they are golden brown, not too light they could be doughy). Once they are perfectly golden brown, brush tops with melted butter once removed.

Tuesday, October 21, 2008

Oriental Green Rice Salad

Joanna asked for this one. I made it and brought it to a dinner a few months ago. My husband, Brandon, told me the ingredients that would go well together and they did! It's really good for you too - especially if you use the chard! We grow the chard in our garden and we pick it when it's young and tender. It is really good as a spinach substitute in salads when picked that way. Another gluten free recipe for the gluten intolerant (other than the chow-mein noodles)!

Oriental Green Rice Salad
3-4 C. Swiss chard (or spinach), chopped fresh
1-1/4 C. brown rice, cooked and cooled (2- 3 C. cooked)
½-3/4 C. Chopped peanuts
¼ - ½ C. Green onions, chopped
1 15-oz. can mandarin oranges

Toss above ingredients together

Dressing:
2 Tbsp. soy sauce
2 tsp. canola oil
1 Tbsp. sesame seeds
2 Tbsp. lemon juice
4-5 tsp. brown sugar
1 clove garlic, minced

Mix dressing together in saucepan until thickens and cool. Toss with salad. Chill until serving. Just before serving, mix salad and then add topping.

Topping:
½ - ¾ C. chow mien noodles

Popular Posts

LinkWithin

Related Posts with Thumbnails