Showing posts sorted by relevance for query pressure cooker. Sort by date Show all posts

Thursday, January 12, 2012

More Healthy Pressure Cooker Recipe Ideas

My most popular posts on this blog, to date are:

1. Pressure Cooker Hard Boiled Eggs - I love 'em too!
2. Favorite Pressure Cooker Recipes  - Are we sensing a theme here?
3. Pressure Cooker Baked Potatoes - Fast, Easy Peasy Potatoes!

I know pressure cooking is getting to be more widely known and I'm using it more and more in my cooking and I gather that this means many of my readers are as well. I know I'm always on the lookout for a good pressure cooker recipe. They are usually much faster, tastier and healthier! I usually use my Cuisinart Electric Pressure Cooker, but I have a Kuhn Rikon Stovetop Pressure Cooker and a Mirro 12qt. Pressure Cooker/Canner that I use occasionally as well.

So you need more recipes like me?

I found a great blog that has 101 pressure cooker meals to try! Yeah! That should keep me going for a while.

My Uncle Chef Brad has a new updated pressure cooker cookbook that will be available soon. And guess what? I made the food on the front cover! My sister and I got together and I made the food and she took the picture. :)


If you can't get the book on amazon yet you can also pre-order it on Chef Brad's website. It's a great book with a lot of wonderful recipes as well as cooking times for the pressure cooker for different foods. The recipe from the cover picture is Sausage and Pasta under Pressure.

In case you need more ideas, here's some more pressure cooker recipes (including Electric Pressure Cooker Recipes) that I found on pinterest that I want to try as well.

Pressure Cooker Risotto


Pressure Cooker Ham and Potato Soup


Pressure Cooker Chicken Cacciatore


Pressure Cooker Mashed Potatoes


Pressure Cooker Vegetable Soup


Pressure Cooker Carnitas Tacos


Another Pressure Cooker Risotto


Pressure Cooker Parmigiana Italia


Pressure Cooker Lentil Soup


Pressure Cooker Green Beans


Pressure Cooker Italian Chicken Noodle Soup


Pressure Cooker Refried Beans

Pressure Cooker White Chicken Chili


And last but not least...in fact this might be my favorite of the bunch!

Pressure Cooker Dulce de Leche - What an easy looking recipe!


Hopefully that will keep you going for a while! For more pressure cooker recipes see my pressure cooker recipe page. And be sure to Follow Me on Pinterest - Especially check out my pressure cooker recipes board. Thanks and happy pressure cookin'!

linked to Friday Favorite Finds

Thursday, March 1, 2012

Can You Make Bread in a Pressure Cooker?

This is probably an odd question that only a pressure cooker enthusiast wonders. So call me a pressure enthusiast, I wondered it! And if you did to, I'm here to tell you the answer so read on...

I read a book a few weeks ago that mentioned something about making bread in a pressure cooker. So I had to see if it would work!

I used my favorite, tried and true bread recipe that makes three 1.5 lb loaves of bread. Two of the loaves I made in the oven. And one loaf I experimented with in pressure cooker. I wanted to see first of all if you could make bread in the pressure cooker. And second of all if there was any benefit to doing it.

Here's the round pan that I used to cook the bread in. Nothing special, it just needs to be able to fit inside the pressure cooker.


I put in the bread dough into the greased pan and pressed it down.


I filled the pressure cooker with 2 cups of water and a splash of vinegar. I've found that adding the vinegar to the water helps so you don't develop a white film around your pressure cooker pan when you cook this. I placed the metal trivet on the bottom of the pressure cooker. Then I made a cool little pan carrier by folding a 1-1/2 to 2 foot piece of tin foil into thirds.


I used that to place my bread inside the pressure cooker and I folded the tin foil down.

I turned on the pressure cooker onto the warm setting for just a few minutes and let it barely start to get warm and then turned it off. I placed the lid on the pressure cooker and let my bread dough rise in the heated little "room" for about 30 minutes until it filled the pan.

When it was done rising I turned the pressure onto high pressure for 20 minutes and let the bread cook. When it was done cooker I released the pressure using the quick release method and here's what I saw when I opened the lid.


It looked a little strange with a very moist top and I wondered it if was done. But I pulled it out and let it cool just a minute in the pan.

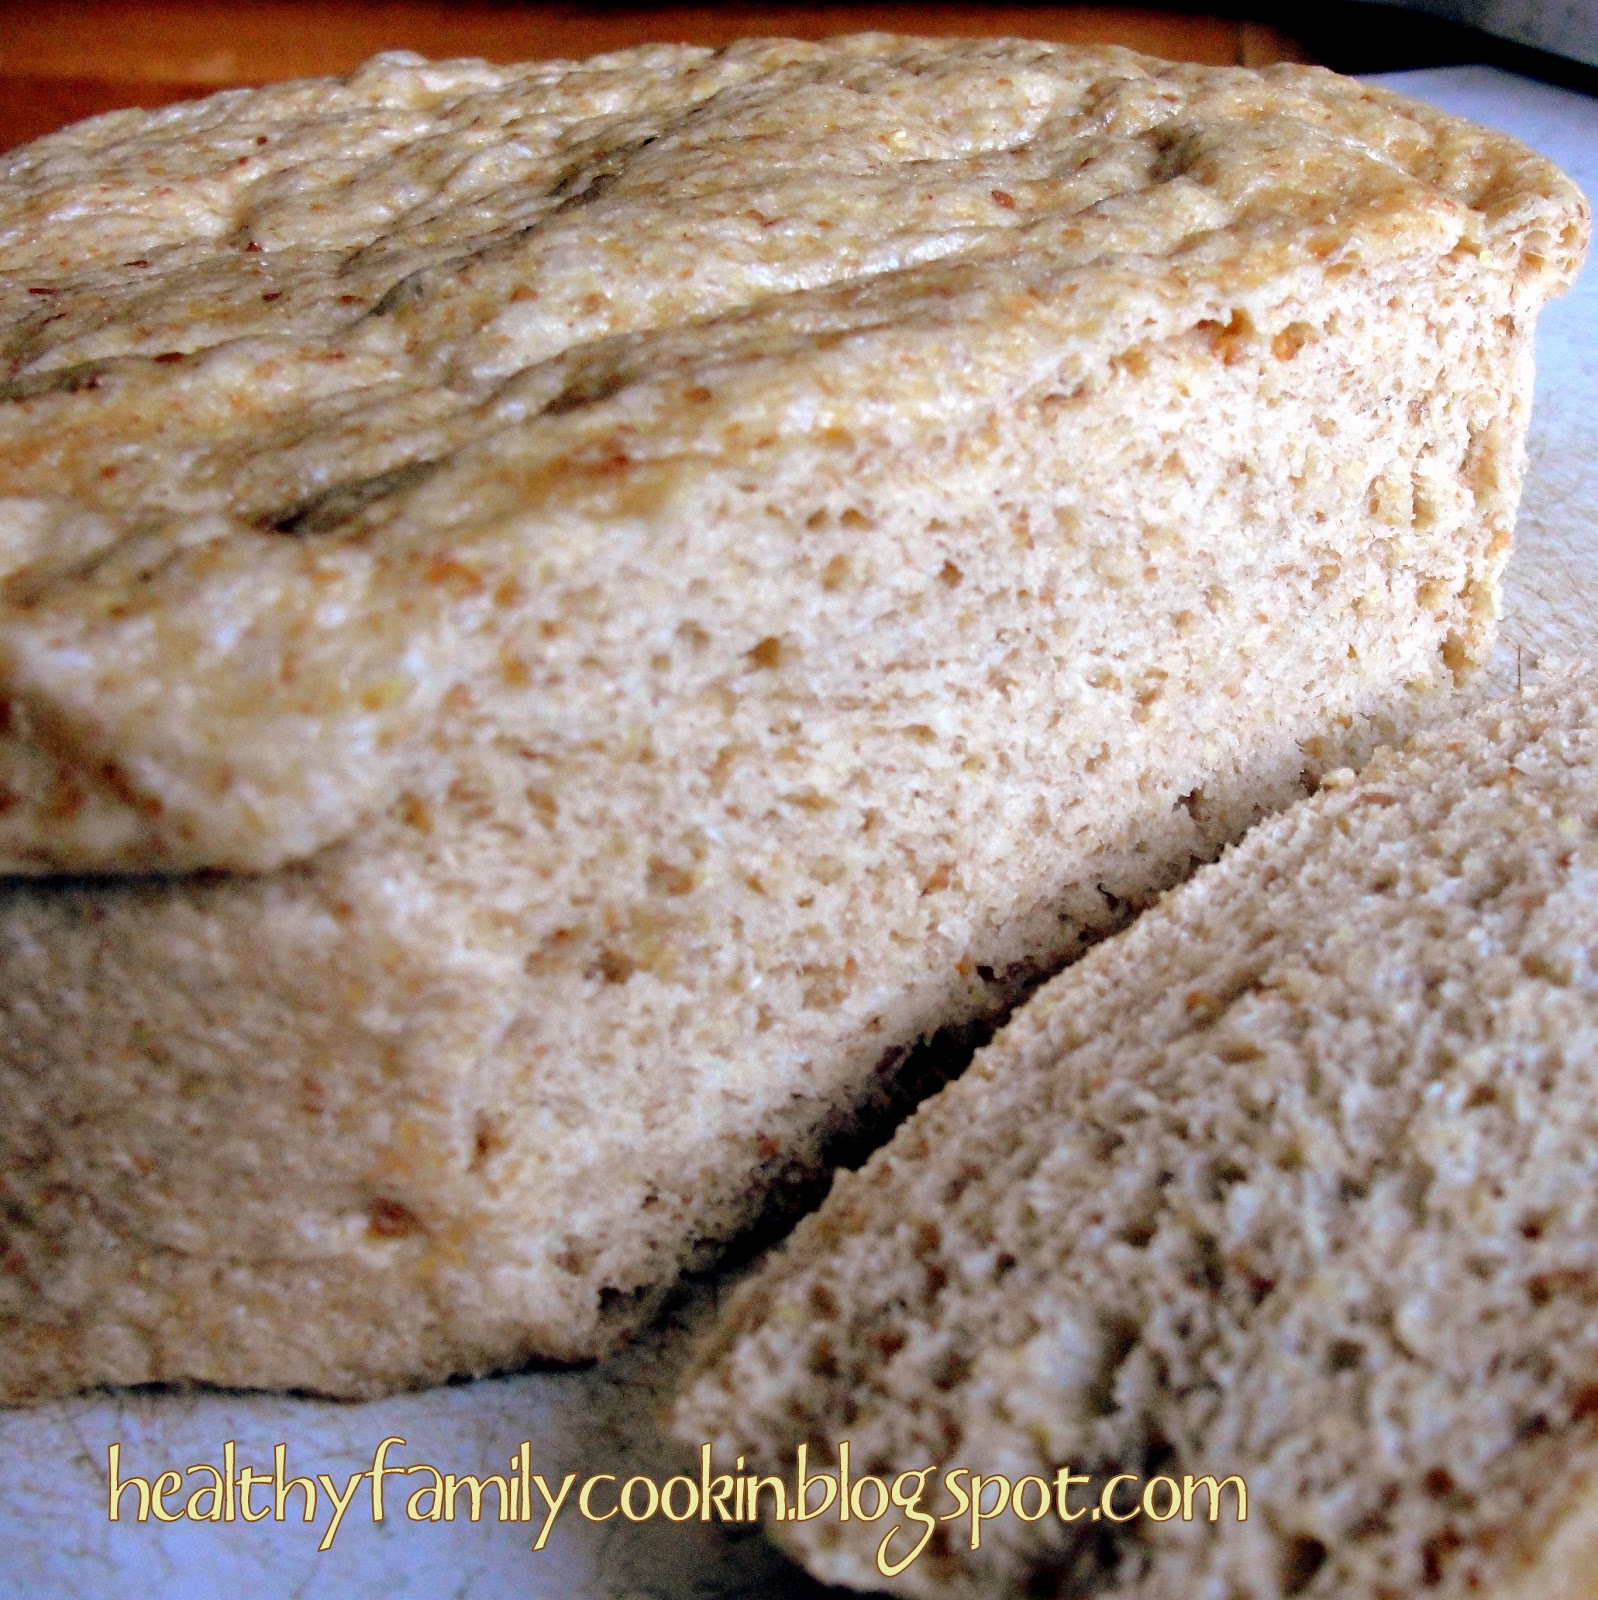
Then I took it out of the pan here's what it looked like on the inside - I was pleasantly surprised! It was completely done, with wonderful texture and tasted delicious!


So to answer the first question, I discovered that YES you could make bread in the pressure cooker. It works great.

Now for the second question...is there any benefit in doing it? And the answer is, that depends! Here's what I discovered:
  1. Pressure cooker bread cooks in about the same time as bread baked in the oven - actually to be specific, the pressure cooker beat the bread in the oven by 1 minute! It was that close. So there's not really any time benefit.

  2. Pressure cooker bread has no crusts - this could be a good or a bad thing. I love bread crusts, but I know there's some people out there that may not. This may be the answer you're looking for to get your kids to eat homemade bread, I don't know. But as for me and my house, we like bread crusts.

  3. There is very little difference in taste or texture between pressure cooker bread and bread baked in the oven - The pressure cooker bread may be a little more moist, but it's really not noticeable. And they taste about the same. 

  4. Pressure cooker bread is kind of unusual looking - this may be a good or a bad thing for you. I like the color of crusty loaves of browned bread out of the oven. And in my opinion, pressure cooker bread leaves a lot to be desired, visually speaking.

So in conclusion, yes cooking bread in the pressure cooker is possible, but I really don't see myself making it that way on a regular basis and probably not ever again to be quite honest. It was a fun little exercise, and you are ever bored, you are welcome to try it yourself. If you just want to bake it in the oven, I won't be offended! In fact I encourage it! Unless...maybe you don't have an oven and you just happen to have a pressure cooker lying around. Or the other possibility is that your kids don't like crusts. And then you can make 1 loaf for them in the pressure cooker and 2 for yourself in the oven!


Whole Wheat Bread {Electric Pressure Cooker Recipe}
Printable Recipe (Electric Pressure Cooker Method)

*Makes three 1.5-lb loaves

3 Cups hot water, microwave on high 2-3 min or until quite warm
1/3 Cup oil
1/3 Cup sugar
1 Tbsp. salt (put in first before adding yeast)
3 Cups + freshly ground whole wheat flour (hard white wheat)
2 Tbsp. yeast on top of flour
½ Cup gluten flour
½ Cup ground flax seed (optional) 

Combine above ingredients in Bosch mixer in order, making sure that the yeast is on top of the flour. Mix with the dough hook. Add more whole wheat flour until the dough pulls away from the sides of the bowl. Then mix for an additional six minutes. Divide dough into 3 loaves (the dough will still be VERY sticky - so sticky that you won't be able to form your loaves without putting oil on your hands). In the pressure cooker, you will only be able to cook 1 loaf of bread at a time. If desired, you can cook the other two loaves using the oven method or freeze the dough to cook in the pressure cooker later.

Grease a round pan that fits into the pressure cooker, place the 1/3 of the bread dough into it, and pressed it down to fill the pan. Place the metal trivet on the bottom of the pressure cooker. Then add 2 cups of water to the pressure cooker and a splash of vinegar. I've found that adding the vinegar to the water helps so you don't develop a white film around your pressure cooker pan when you cook this way.

Then make a little pan carrier by folding a 1-1/2 to 2 foot piece of tin foil into thirds. Place the tin foil carrier underneath the round bread pan and use it to place the bread inside the pressure cooker. Then fold the tin foil down around the edges of the bread pan so it doesn’t prohibit the dough from rising.

Turn on the pressure cooker onto the warm setting for just a few minutes and let it barely start to get warm and then turn it off. Place the lid on the pressure cooker and let the bread dough rise in the heated little "pressure cooker room" for about 30 minutes until the dough has risen to fill the pan.

When it is done rising, turn the pressure cooker on to high pressure and cook the bread for 20 minutes. Release the pressure using the quick release method. Allow the bread to cool. Then remove from the cooker using the foil handle. Slice, eat, and enjoy.

For more pressure cooker recipes see my pressure cooker recipe page. Or follow my pressure cooker board on pinterest.

Thursday, March 8, 2012

Corn bread in a Pressure Cooker {Electric Pressure Cooker Recipe}

After last week's experiment with making a yeast type bread in the pressure cooker, I had a few people suggest to try quick breads. So this week I present to you my experiment with corn bread in a pressure cooker using freshly ground popcorn.

Before I start, just a word about popcorn. I love to use ground whole grain popcorn (yes, un-popped) when making corn bread! One of the main reasons is because I like to grind my popcorn really fine into flour rather than corn meal. Before I found this secret, I never enjoyed eating corn bread because the texture was so grainy. Try it. It really does make a difference! Also the ground popcorn has a wonderful fresh flavor that you don't get in corn meal that's been sitting on the shelf for several weeks. It's healthier too because whole grain flours lose nutrients as they sit on the shelf.

So on to cooking corn bread in the pressure cooker. If you don't want to cook it in the pressure cooker or don't have a pressure cooker, here's my instructions for cooking it in the oven.


Corn Bread {Electric Pressure Cooker Recipe}

*Makes 8 servings

INGREDIENTS:
1 Cup milk
¼ Cup butter, melted
1 large egg
1-1/4 Cup cornmeal (made with fine freshly ground popcorn)
1 Cup white flour *see note
½ Cup sugar
1 Tbsp. baking powder
½ tsp. salt

DIRECTIONS:
Add 2 Cups of water and a splash of white vinegar to the empty pressure cooker. I've found that adding the vinegar to the water helps so you don't develop a white film around your pressure cooker pan when you cook. Place the metal trivet on the bottom. Then spray a round pan that fits into the electric pressure cooker with oil. 

Beat milk, butter and egg in large bowl. Stir in remaining ingredients all at once just until flour is moistened (batter will be lumpy). Pour batter into round pan. Wrap pan with aluminum foil. Fold a 1-1/2 to 2 foot piece of aluminum foil into thirds and use that to carry the pan in and out of the pressure cooker (See my pressure cooker bread post for an example of this). Pressure on high pressure for 16 minutes. Naturally release the pressure. Serve warm.

*Note: alternatively you can try it with a whole-grain flour. I've made it with wonder flour before and it it's really tasty, just a bit more crumbly than with white flour.

Reactions & thoughts on pressure cooking cornbread: 
It tasted delicious! My oldest son said I should make it this way every time, he loved it. In fact he even asked for some today in his lunch. The pressure cooker made it very moist inside.

There wasn't a whole lot of time savings. I tried to cut the time to 12 minutes the first time I made it and it was still raw inside. The second time I did 16 minutes and it came out perfectly done. In the oven it takes about 20-25 minutes so if you count time for the pressure cooker to heat up and cool down, you're not saving much time.

It wasn't the prettiest thing in the world. I covered it with aluminum foil and it stuck a little so next time I either need to spray the foil or try it uncovered.

Well, I'm on the fence a little on this one. I haven't decided which way I'll be cooking corn bread in the future...in the oven or in the pressure cooker. What do you think? Have you tried making corn bread in the pressure cooker? Got any tips for me? What works for you? Do you think it's worth it? Got a better recipe for me to try?


For more pressure cooker recipes see my pressure cooker recipe page. Or follow my pressure cooker board on pinterest.

Tuesday, February 19, 2013

Garlic Roasted Smashed Potatoes

Today I'm sharing a delicious recipe for garlic roasted smashed potatoes. You can make these potatoes easily in either a pressure cooker or on the stove top and I'll be sharing with you both methods. My preferred method to make these is the pressure cooker simply because it's faster, but if you don't have a pressure cooker you can still enjoy these savory, flavor-packed potatoes.

I realized that it's been a while since I've posted a pressure cooker recipe. Now let it be known that that is in no way an indicator of how often I cook meals with my pressure cooker. I love my pressure cooker and use it religiously to cook at least two or three (usually more) meals a week. The reason I haven't posted any pressure cooker recipes for a while is because of the learning curve. I'm still not a pro at determining cooking times and it usually takes me several times to get a recipe right. Since my family balks at eating the same meal two or three or four times a week (I guess most folks do...). I have to wait a while until I cook the same meal again. But I have several recipes that are really close to perfect and I hope that in the next month or two I'll be able to share them with you.


That being said, this is a great pressure cooker recipe that I really enjoy. The original recipe that I used actually comes from a recipe from Chef Brad's Pressure Cooker Cookbook. I've modified it slightly in a few ways. First, I've left the skins on the make them garlic smashed potatoes. Smashed potatoes are great because potato skins have lots of vital nutrients and vitamins that our body's need. Plus, I don't have to sit and peal potatoes. Call me lazy, but I don't like to peal potatoes. 

Also in this recipe, I modified a method that was shared by hippressurecooking.com to roast garlic. I cooked the garlic in the pressure cooker a little longer than she suggested, simply because I wanted to cook the garlic together with the potatoes. Because I only needed 6 cloves of roasted garlic, I wrapped the cloves in a piece of tin foil and steamed and then roasted just what I needed rather than roasting the entire head. It worked great. 

Pressure Cooker Garlic Roasted Smashed Potatoes
Printable Recipe

*Serves 8-10

INGREDIENTS:
6 Large Potatoes, washed and quartered  *See Note 1 below
6 whole garlic cloves
1 tsp. olive oil
1-12-oz. can evaporated milk
1 cube butter
Salt & Pepper, to taste

DIRECTIONS:
In the pressure cooker, place the potatoes and 2 Cups of water. Place whole garlic cloves in a piece of aluminum foil with 1 tsp. olive oil and wrap tightly. Place the garlic tin foil ball on top of the potatoes. Heat pressure cooker to high pressure for 8 minutes. After the cooking time is up, use a quick release method to release the pressure. Open the tin foil ball with the steamed garlic cloves and place the open foil under a hot broiler for about 5 minutes to caramelize and turn golden (*See Note 2 Below). Then remove garlic skins, and crush. Drain off the water from the potatoes. In a large bowl (I use a large Bosch mixer) add the cooked potatoes, the crushed, roasted garlic cloves, the evaporated milk, 1 cube of butter and salt and pepper to taste. Mash the potatoes until smooth (I use the whips on the Bosch). Serve immediately or keep warm in the pressure cooker until serving.

*Note 1: You can peel the potatoes before cooking them if you prefer mashed potatoes. I usually keep the skins on to add nutrition and save a little time. Just make sure you scrub the potatoes really well if you leave the skins on.

*Note 2: You can also skip this step of caramelizing the garlic if you're in a hurry and still get a strong, delicious garlic-y flavor in the smashed potatoes.

*Recipe Sources: Recipe adapted from Chef Brad's Pressure Cooker Cookbook and roasted garlic method adapted from hippressurecooking.com

No Pressure Cooker? No problem! You can still make this recipe using the following method.

Garlic Roasted Smashed Potatoes
Printable Recipe

*Serves 8-10

INGREDIENTS:
6 Large Potatoes, washed and quartered  *See Note 1 below
6 whole garlic cloves
1 tsp. olive oil
1-12-oz. can evaporated milk
1 cube butter
Salt & Pepper, to taste

DIRECTIONS:
Preheat oven to 375 F. Place quartered potatoes in a large pot and cover with water. Heat to boiling, turn down heat to simmer and then cover potatoes and cook until tender. Meanwhile place the whole garlic cloves in a piece of aluminum foil with 1 tsp. olive oil and wrap tightly with foil. Place the garlic tin foil ball in the oven and cook for about 20-25 minutes or until garlic is golden brown and tender. Then remove garlic skins, and crush. When potatoes are tender, drain off the water from the potatoes. In a large bowl (I use a large Bosch mixer) add the cooked potatoes, the crushed, roasted garlic cloves, the evaporated milk, 1 cube of butter and salt and pepper to taste. Mash the potatoes until smooth (I use the whips on the Bosch). Serve immediately or keep warm until serving.

*Note 1: You can peel the potatoes before cooking them if you prefer mashed potatoes. I usually keep the skins on to add nutrition and save a little time. Just make sure you scrub the potatoes really well if you leave the skins on.

Recipe Source: healthyfamilycookin.blogspot.com
I used a Bosch Mixer to whip up the Smashed Potatoes until creamy

For more pressure cooker recipes, please see my pressure cooker recipes page or follow my pressure cooker recipes board on pinterest. 

This week I'll be linking to some of these link parties.

Thursday, February 16, 2012

Alphabet Soup {Electric Pressure Cooker Recipe}

I've gotten through almost a whole week of spelt posts without any spelt jokes! Well that's pretty good, if you ask me, but sorry that's going to end right now...

How did the Mom making alphabet soup say "I love you?"

She spelt it out!

Ha ha! Okay, I know that one was pretty cheesy, but I couldn't resist. Especially with valentine's day just barely behind us.

On a more serious note, soup is a great thing to include spelt (or any whole grain) in. It's easy to hide (the kids don't notice) and it adds nutrition and texture. It's really easy to do this when you use a pressure cooker! Here's an alphabet soup recipe that I've added spelt and adapted for the pressure cooker from the prudent homemaker's (non-pressure cooker) version here. This is a wonderful soup for kids because it's so colorful, has a very simple flavor (which is a good thing), but is still interesting enough for adults to enjoy.


Alphabet Soup {Electric Pressure Cooker Recipe}

*Serves 6-8

1 28 oz. can tomatoes
1-1/2 Tbsp. beef base (or 5 tsp. beef bouillon)
2 tsp. dried onion
1 tsp. granulated garlic (or 2 garlic cloves)
2-3 carrots, diced
1/2 Cup uncooked spelt (or barley or brown rice)
1 Quart water (4 cups)

Combine above ingredients in an electric pressure cooker and pressure on high pressure for 12 minutes. Use quick release method. Open up pressure cooker and then add:

1 can green beans
1 can corn
1/2 Cup alphabet pasta

Close the pressure cooker lid again and pressure on high for 3 minutes. Then release pressure (quick or naturally), salt and pepper to taste and enjoy! Very simple meal that the whole family will love. In the pressure cooker it literally takes under 30 minutes from start to finish.

I've also made this recipe in the pressure cooker without adding spelt. It's even faster if you're really in a hurry. Just add ALL the ingredients (including green beans, corn and alphabet pasta) but use only 3 cups of water. You could substitute red or white quinoa for the spelt or just leave it out completely. And pressure it on high for 6 minutes. Very, very simple, very quick and very economical (plus a lot healthier than the store bought variety)! Everything I love in a great recipe!

Recipe Source: Adapted from the prudent homemaker


For more pressure cooker recipes see my pressure cooker recipe page. Or follow my pressure cooker board on pinterest.

Linked To: Tastetastic Thursday, Recipe Linky, Cast Party Wednesday, It's a Keeper Thursday, What's Cooking Thursdays, Full Plate Thursday

Saturday, April 9, 2011

Pressure Cooker Hard Boiled Eggs

I'm so excited to find another great use for my electric pressure cooker! And just in time for Easter. Here's the link to making perfect hard boiled (or soft boiled) eggs in your pressure cooker!. I tried it today for lunch and the eggs came out perfect. And it's so much easier than boiling them on the stove!!

I put the eggs on the trivet and used canning lids to separate my eggs so that they wouldn't bump into each other (see the picture).

This way you can do several at a time - could probably have fit more if I put them in between the canning lids. I put 1 cup of water in cooker and pressured them on low for 6 minutes. I let the pressure go down naturally. And then immediately took the eggs out and soaked them in cold water to stop the cooking. Perfect! And a lot easier to crack than the ones you make on the stove. Enjoy!

Hard Boiled Eggs {Electric Pressure Cooker Recipe}

*This method for cooking hard boiled eggs in the pressure cooker is so much easier than the stove top. It's quick and efficient, you don't have to worry about water boiling over, and the result is perfect hard-boiled eggs every time!

*Note: In my 6 quart Cuisnart Electric pressure cooker I can cook up to 10 eggs at once

INGREDIENTS:
Eggs

EQUIPMENT:
Electric pressure cooker with metal trivet
1- 5 small canning lids
  
DIRECTIONS:
First place the trivet in the bottom of the pressure cooker. Next add about a cup of water. Place the canning lids on the bottom and arrange the eggs in and around the lids. Heat up the pressure cooker until it reaches low pressure and then cook for 6 minutes. Allow the pressure to go down naturally and then immediately remove the eggs and cool them in ice water to stop the cooking process. When they are cool, the eggs will crack with ease, look beautiful, and taste perfect every time! 

Recipe Source: adapted from Hip Pressure Cooking

For more pressure cooker recipes see my pressure cooker recipe page. Or follow my pressure cooker board on pinterest.

Thursday, March 22, 2012

Delicious Fudgey Brownies {Electric Pressure Cooker Recipe}

I discovered a secret that I really shouldn't have. Because, let me tell you,
It's Dangerous!
Here's my disclaimer: There are some recipes that cooks who want to remain relatively skinny should never find and this is one of them! So use caution and proceed to the end of this blog post at your own risk. Don't let the title of my blog fool you, this recipe is not healthy!

I've used my electric pressure cooker for many things - to cook grains and beans, make soups, stews, chilies, etc. It's a marvelous tool. One day not too longer ago the thought popped in my head: "I wonder if my pressure cooker would cook brownies?" That's an odd thought because I have many brownie recipes that are absolutely delicious in the oven. So why try the pressure cooker? But the thought persisted so I had to comply. And....drum roll please...that brought about this amazing, fantastic brownie recipe that is unlike anything you will ever taste coming out of the oven. Do you like those moist, fudgey, chocolately, melt-in-your-mouth brownies? Well, here you have 'em - in their perfect form!
Moistedness - perfect! 
Fudgyness - perfect!
Chocolateness - perfect!
Melt-in-your mouth - yes!

So why cook brownies in a pressure cooker? Let me explain my reasons and you might think of some more of your own when you make them.

1. Texture - the best way to describe the texture of these brownies is to say they are a cross between fudge and brownies. They are actually best cooled off in my opinion because they kind of settle down in the pan. This increases their "fudgyness" which makes them even more wonderful.

2. Easiness - one of the great things about electric pressure cookers is you can prep the food, start the pressure cooker and walk away. You can go to work or go pick up your kids from piano lessons, and when you come home, the food is waiting, all cooked and still warm, for you to enjoy.

3. Less Heat & Energy - cooking brownies in the pressure cooker will use less energy than in an oven. I'm especially looking forward to making these in the summer time when the oven heats up the house so much.

So now that we have the justifications down, here's the recipe!


Delicious Fudgey Brownies {Electric Pressure Cooker Recipe}


INGREDIENTS:
1/2 Cup butter
1/4 Cup unsweetened cocoa powder
1 Cup sugar
3/4 Cup unbleached white flour
3/4 tsp. baking powder (or 1/2 + 1/4 tsp.)
1/4 tsp. salt
1 Tbsp. honey
2 eggs
1/2 Cup chopped walnuts, optional
2 Cups water
1 Tbsp. vinegar, optional

DIRECTIONS:
Melt the butter in a saucepan on the stove top. Remove from heat and mix in cocoa powder. Allow to cool slightly. In a medium mixing bowl combine sugar, flour, baking powder and salt and mix well. Then to the flour mixture add the honey, the eggs and the cooled butter/cocoa mixture. Mix well. Add nuts, if desired. Pour batter into a greased 8" diameter round pan or casserole dish. Cover the brownie pan completely with a two to three foot piece of aluminum foil.

Place the metal trivet on the bottom of the electric pressure cooker. Add 2 cups of water and 1 Tbsp. vinegar into the pressure cooker. The vinegar will help prevent your trivet and pressure cooker from developing a milky white film in it. Fold another two to three foot piece of aluminum foil into thirds lengthwise to make handle that will help you easily lift the pan in and out of the pressure cooker (see picture below for an example). Place the foil strip underneath the brownie pan and fold the edges together over the pan in order to easily lift the pan into the electric pressure cooker. Place the brownie pan levelly on top of the metal trivet and fold down the sides of the foil on top of the pan.


Then lock the lid into place and pressure on high pressure for 35 minutes. Pressure can then be released naturally or you can use the quick release method. The brownies can be served warm or cold, but they are easier to cut when chilled slightly. Delicious any way you serve it! You can't go wrong. But I think they are the very best the next day!

Recipe Source: healthyfamilycookin.blogspot.com

Friday, October 17, 2008

The Benefits of Pressure Cookers

One of the best tools for cooking grains and legumes is a pressure cooker. Pressure cookers have historically been labeled as "unsafe", but this is not true of pressure cookers today. Just like anything else, most pressure cookers are perfectly safe when their directions are followed. Here are some answers to commonly asked questions about pressure cookers.

How does a pressure cooker work?
The answer from a physics perspective would take up several pages, so I'll spare you and give a brief synopsis. Pressure cookers have tight fitting lids that lock into place. As the liquid inside the pot evaporates it makes steam and the steam rises to the top of the pot. As the steam rises it creates pressure in the pot and the temperature of the contents begins to increase. As the temperature and pressure increase, the cooking time of food is sped up considerably. For more details on the science behind pressure cooking, see this popular science article: http://www.popsci.com/node/22352.

What are the benefits of using a pressure cooker?
  • Pressure-cooking can cook foods in 1/3 the ordinary time on average and often over 10 times faster. You can cook almost all grains and legumes from start to finish (no soaking necessary) in an hour or less.
  • Pressure-cooked foods retain their flavor better than other methods because (1) the steam permeates the food and unlocks its flavor and (2) pressure cooking doesn't use a lot of water where flavors can dissolve into.
  • Pressure-cooked food retains more of its nutrients than other cooking methods. This is because of shortened cooking times and less water used.
  • When cooking in a pressure cooker, you can use less fat.
  • Pressure cooking uses less energy than most other cooking methods.
What kind of pressure cooker should I buy?
I use a Kuhn Rikon and I highly recommend it. It has performed excellently. My "dream" pressure cooker is pictured here. It is a 6 Quart Digital Cuisinart. I have used this pressure cooker before and it is a miracle. It plugs into an outlet and has a digital timer. You pour the contents in, turn it on and it cooks dinner for you. It's just like a slow-cooker, but it's not slow. When it's done cooking, it will keep the food warm until you are ready to serve it.


Does anyone have any more information to share about pressure cookers, other pressure-cooker brands they like, or experiences with pressure cookers to share?

Update: I have since bought a 6 Quart Cuisinart Electric Pressure Cooker and it is wonderful!

Tuesday, February 7, 2012

Chicken Noodle Soup {Electric Pressure Cooker Recipe}

This recipe is comfort food at it's best! Perfect for a cold, winter day. If you're not feeling well, it is the cure - it really is! I've posted the crock pot version here in case you don't have a pressure cooker, but a pressure cooker makes it SOO much easier to make! You can have it made and on the table in 30 to 40 minutes.

We made this a few days ago for a soup & bread party that we had at our house. We like to invite our neighbors over to get together every other month or so. A dear lady that lives around the corner came and she was so excited - she loves this soup! We made it for her once before and she said it was the best chicken soup she's ever tasted.

And do you know what the secret ingredient is? Squash! Can you believe it? Do you notice that the color is a little more orange that your average chicken noodle soup? It's lovely isn't it? Not only does it look prettier, but the squash gives the soup an extra burst of "comfort" taste. You can use any squash that blends into a smooth puree. Hubbard would be perfect, since that's the squash I'm featuring this week!


Gourmet Chicken Soup {Electric Pressure Cooker Recipe}

*If you don’t have a pressure cooker, you can also make this recipe in the crock pot!

*Note: The secret ingredient in this recipe is the pureed squash. You can cook and puree any winter squash the same way I've demonstrated here with pumpkin or you can use canned pumpkin.

*Serves 6-8

6 Cups water
3 tsp. instant chicken bouillon
1 tsp. celery seed
1 tsp. onion salt
Parsley (as much as desired)
1 tsp. pepper
2-3 chicken breasts (boneless or not), leg quarters or leftover turkey meat
1-2 Cups chopped onions
2 Cups diced carrots
2 Cups diced celery
2 Cups cooked, pureed Hubbard Squash (or other winter squash - pumpkin, butternut, banana, etc) 

5-8 oz. Egg Noodles or 1-2 Cups of cooked rice (we like the wide or narrow egg noodles of the Country Pasta brand or you can make your own)
2 cans Cream of Chicken or Mushroom Soup (or thicken it with ultra jel)
Salt & Pepper to taste

Combine all the ingredients except egg noodles and cream soups in an electric pressure cooker. Pressure on high for 21 minutes (you only need to cook for 6 minutes if using pre-cooked meat). Use the quick release steam method. Then remove chicken carefully, discard bones, and chop meat. Return chopped chicken to pot. Add 2 cans cream of chicken or mushroom soup (or one of each) and heat with the lid off until warm on the "saute" or "brown" pressure cooker setting. Stir occasionally. Meanwhile cook the egg noodles separately in boiling water on the stove according to package directions. Drain and add to soup when done. Taste the soup and add salt or pepper to taste. 

I haven't tried cooking the noodles with the soup in the pressure cooker - I'm pretty picky about my noodle "done-ness". I like to control how done they are really carefully and that's easier to do on the stove. You can add cooked rice instead of the egg noodles or eat it without. It's also Gluten-free as long as you don't put in the egg noodles and thicken with ultra-gel. 

*Note: This recipe is delicious served with fresh, homemade bread!

Recipe Source: healthyfamilycookin.blogspot.com


For more pressure cooker recipes see my pressure cooker recipe page. Or follow my pressure cooker board on pinterest.

Tuesday, April 9, 2013

Perfect Potato Salad with Quinoa

I had a wonderful time with my family over spring break, but it sure is good to be back home and back to normal life and a regular schedule again. One of the things I missed the most was eating healthy, home cooked meals. It gets harder and harder to eat processed-white-flour-packed-foods when your body is used to the flavor and nutrition of grains. But even after just three days of home cooked meals again I'm starting to feel back to my normal self.

One thing that I've discovered that I love about cooking from scratch is that you can change a recipe up to make it healthier with very little effort and without sacrificing any of the original recipe's deliciousness. This potato salad is a great example of this. I added cooked white quinoa to the salad, thus upping the nutrition by a lot because white quinoa is a perfect protein and very healthy (If you're interested in learning more about it, I devoted a whole post to white quinoa last year). White quinoa is the perfect grain to disguise in potato salad because it blends in so well and no one will even know it's there.

I'm excited to share with you this recipe that you can make in your pressure cooker. I wrote this recipe up for the pressure cooker, but don't worry if you don't have one, you can still cook all the ingredients on the stove and combine them to make a very delicious potato salad. Spring is here (despite the snow I woke up to this morning) and summer is close on it's way! This is a delicious recipe that you can serve with a barbecue or picnic this spring or summer. I brought it to a barbecue my family had over Easter weekend and everyone loved it. Enjoy.


Perfect Potato Salad with Quinoa
Printable Recipe

*Serves 10-12
*This is a pressure cooker version of the recipe, but you can easily make it without a pressure cooker by cooking the white quinoa, potatoes and hard boiled eggs on the stove. 

INGREDIENTS:
Salad:
10 eggs
1/2 Cup white quinoa
5 lbs. potatoes (I used about 10 large Russets, but you can use other varieties)
1 Cup sliced olives

Dressing:
2 Cups mayonnaise (Light mayo works fine)
2/3 Cup buttermilk
1 1/2 tsp. dried parsley
1 tsp. salt
1 1/2 tsp. minced dried onions
1 1/2 tsp. garlic salt
1 tsp. seasoned salt
1 tsp. ground black pepper
2 Tbsp. yellow mustard

DIRECTIONS:
Hard boiled eggs (this step can be done ahead of time):
I like to hard boil my eggs according to this method in the pressure cooker because the eggs are easy to peel and come out perfect every time. Place the metal trivet that comes with the pressure cooker on the bottom of the pressure cooker. Add about a cup of water and place a few canning lids on the trivet (this is to keep the eggs from bumping into each other, but you may not need very many since you will be cooking 10 eggs). Arrange the eggs in and around the lids. Heat up the pressure cooker until it reaches low pressure and then cook for 6 minutes. Allow the pressure to go down naturally and then immediately remove the eggs and cool them in ice water to stop the cooking process. Let pressure release naturally and then cool and refrigerate the eggs. 

Cooked Quinoa (this step can be done ahead of time):
Add 1/2 Cup white quinoa to the pressure cooker along with 1 Cup of water. Pressure on high for 6 minutes, then do a quick release. Cool and refrigerate. 

Potatoes (this step can be done ahead of time):
Peel the potatoes and place on top of metal trivet in pressure cooker. Add 2 Cups of water to cooker, lock the lid in place and cook on high pressure for 6 minutes. Naturally release the pressure, then cool and refrigerate potatoes.

For the salad, dice the cooked potatoes into bite sized pieces and add to a large serving bowl. Dice the hard boiled eggs and combine with the potatoes. Add to the bowl the chopped olives and the cooked and cooled quinoa. Then toss potato salad ingredients together until evenly distributed. Combine the dressing ingredients in a quart sized canning jar or a blender and shake or blend until combined. Pour dressing onto potato salad until the correct consistency is found. Refrigerate potato salad at least 2 hours to combine flavors or until ready to serve.

Recipe Source: Adapted from Mel's Kitchen Cafe


This week I'll be linking to some of these link parties.

Thursday, January 6, 2011

Favorite Pressure Cooker Recipes

My sister asked me what some of my favorite pressure cooker recipes are. She just got one of these Cuisinart electric pressure cookers. You can buy them at Costco for like $70! They are wonderful!
Here's a few of my favorite recipes to make it my pressure cooker:

Chef Brad Pressure cooker Meals in Minutes - this is an excellent formula for pasta meals cooked in the pressure cooker that literally take minutes of preparation and come out delicious every time! There's so much you can do with this recipe. Try changing the meat to be ground turkey, italian sausage, ground beef, chicken, etc or try vegetarian. Try changing the spices. Try changing the grain - red or white quinoa, cooked kamut or teff. Add different vegetables or sauces. This is a wonderful recipe that really shows off the electric pressure cooker. Note: these do not work in other pressure cookers as the food on the bottom will burn. In the cuisnart it cooks up perfect.

"Cafe Rio" Black Beans - This recipe is soooo good! I make these and have a wonderful vegetarian dinner served as a taco salad or bean burritoes. Yum.

Garlic Mashed Potatoes - I used the recipe in Chef Brad's pressure cooker cookbook. And it is so yummy!

Sweet Brown Rice Breakfast - This is really yummy! I tried this for the first time and Chef Brad's house and it is really good. Love it!

Here's a few of my favorites. Besides these I love to use it to cook chicken, grains and beans. Beans are done so fast without soaking and they turn out excellent!

For more pressure cooker recipes see my pressure cooker recipe page. Or follow my pressure cooker board on pinterest.

Popular Posts

LinkWithin

Related Posts with Thumbnails