Showing posts with label Sugar Free. Show all posts

Tuesday, March 3, 2015

Chocolate Honey Cookies


This recipe has been in the works for a long time. Like more than a year. I kept running into problems with it, but I'm happy to say that it's now perfected and I'm so excited to share it with you. It is one of our FAVORITE kinds of cookies. They are absolutely divine straight out of the oven. Melt in your mouth deliciousness. They are totally amazing even without chocolate chips (and completely naturally sweetened). The chocolate chips add a little bit more ooey gooeyness to the mix. So you really should try them that way too. Yum. 

These cookies are strutting 100% whole grain flour, naturally sweetened, and butter (no fake fats). So who says cookies can't be healthy and still taste amazing? Well hopefully after trying these, it won't be you. 

And in case you're still not convinced. I'll tell you that they passed my pickiest kid's taste buds. The kid who can tell with one bite if something is sweetened with honey and not sugar (not kidding...). Well, guess what? I'm happy to report that I fooled him with this one! Ha! Mission accomplished.


Chocolate Honey Cookies
Printable Recipe

*Makes 2-3 dozen cookies

INGREDIENTS:
2-1/4 Cups Wonder Flour
2/3 Cup Natural, unsweetened cocoa powder
1 tsp. baking soda
1/4 tsp. salt
1 Cup (2 sticks) butter, softened
3/4 Cup raw honey
1 tsp. vanilla extract
2 large eggs
1 Cup semi-sweet or dark chocolate chips, or homemade chocolate chips (Optional)

DIRECTIONS:
Preheat oven to 350 F. In a small bowl, whisk together the Wonder Flour, cocoa powder, baking soda, and salt. In a large bowl, beat together the butter, honey, and vanilla extract until creamy. Add the eggs, one at a time, beating well after each addition. Gradually beat in the flour mixture. Add chocolate chips, if desired. Drop by rounded spoonfuls onto ungreased baking sheets or line them with parchment paper.

Bake for 9-11 minutes until the edges are set but centers are still soft. Cool on the baking sheets for 2 minutes, then remove to wire racks to cool completely.

Recipe Source: healthyfamilycookin.blogspot.com

Tuesday, January 6, 2015

Lemon Curd {Honey Sweetened}


I've talked before about how different times of the year I crave different foods. I've really started to notice this in the last few years. It's really fascinating to me. In the dead of winter I crave lemons. Not just lemons on their own. And not really lemonade (although I'm sure I wouldn't turn it down if you offered me some freshly squeezed lemonade right now). Mostly I just crave food made from lemons. Happy yellow, bright and lovely, lemon flavored food. Real lemon flavored, not that icky fake lemon flavor. Take this lemon curd, for example. I have totally been craving this for the past week or so. The other day I just held a lemon and smelled it for about an hour and it was so therapeutic. But I haven't stopped thinking about this lemon curd until I finally whipped up a batch today. YUM! I couldn't wait to share it with you because today I perfected my honey sweetened version of lemon curd. Beautifully perfect and perfectly delicious.

Maybe you're asking yourself right now, what in the world would I use lemon curd for? What is it? I was in your same boat a few years ago. Then one day I attended a tea party at my aunt's house where she served hot cocoa  instead of tea (we don't drink tea). But she had all the courses that a real English tea party would have. I love tea parties. And she had lemon curd. And I just basked in it's deliciousness. Served on top of a hot scone. Oh my. Tea party heaven. I can't really describe the taste. Tangy, but sweet. Smooth and melt-in-your-mouthy. So please don't wait until your next tea party to make this lemon curd. Honestly, that may be too far in the future (even if it's tomorrow). This lemon curd is delicious in pies, cute little tarts, trifle, as a filling for cakes, with scones, served with fresh berries, etc. Let your imagination run wild. Or better yet, go make some and stick your finger in it and just lick it to get your winter lemon fix every few minutes. That's what I plan to do.


Lemon Curd {Honey Sweetened}
Printable Recipe

*Makes 1-1/2 Cups

INGREDIENTS:
3 large eggs
1/3 Cup honey (or 3/4 Cup white sugar)
1/2 Cup fresh lemon juice (from about 1-1/2 medium lemons)
4 Tbsp. butter, room temperature, chopped into pieces
1 Tbsp. lemon zest (finely grated outer part of lemon)

DIRECTIONS:
Heat a large saucepan half filled with water over medium high heat, until it simmers. In a medium stainless steel bowl, whisk the 3 eggs together. Then add the honey (or sugar) and fresh lemon juice. Yes it needs to be fresh. Whisk together until combined. Put this bowl in the pan of simmering water and whisk it constantly until it thickens (like sour cream). This should take about 5-10 minutes.

Remove bowl from heat and stir in 4 Tbsp. butter, chopped into pieces and 1 Tbsp. lemon zest. At this point you can strain the curd through a fine mesh strainer if desired (I like to do this if there are any lumps in it). Then cover with a piece of plastic wrap directly on the surface of the curd to avoid getting a skin on the curd. Then cool at room temperature or refrigerate for up to 10 days.

*Variation: If you want a lighter lemon flavor, whip 1/2 Cup heavy whipping cream and gently fold into the curd once it has cooled to room temperature.

Recipe Source: Adapted from Joy of Baking

Tuesday, December 9, 2014

Marshmallow Popcorn {Honey Sweetened}


The season of sweets is in full swing around here. I love to make and eat treats right along with the rest of you. And even this time of the year sometimes I try to be a little healthier in the treats that I make. It's great to have yummy options without sugar that are still delicious and special to this time of the year. Today I want to post a wonderful little honey-sweetened discovery that I made the other day. This recipe is truly my own discovery, but it was born by joining together other people's ideas. That is usually how wonderful discoveries are made anyways, isn't it? 

The recipe idea started when I ran across this recipe for honey sweetened marshamallows. Yes I've made them on several occasions and they are tasty little wonders. Then two years ago around Christmas a lady in our neighborhood brought us the most wonderful popcorn you've ever tasted. It tasted like caramel corn, but so much better. Not hard and teeth-breaking, but soft and chewy and I loved it. So I begged the recipe from her and she brought it by and the main ingredient was marshmallows. I began to wonder and dream (like for a few years) if I could combine the two wonderful recipes to make a honey sweetened version of that yummy marshmallow popcorn. Well guess what? I finally did it the other day. And it is truly amazing! It's hard to believe that it contains no processed sugar. It's soft and sweet with a wonderful marshmallow-y, vanilla-y flavor. Yum. You'd better make sure to include this one in your holiday treats this year.


Marshmallow Popcorn {Honey Sweetened}

INGREDIENTS:
3 Tbsp. unflavored gelatin 
1 Cup cold water, divided
1-1/2 Cups honey, divided
1/4 tsp. salt
1 tsp. vanilla extract
2 Cubes butter
1-1/2 to 2 Cups popcorn kernels, popped (or 8-10 quarts popped popcorn)

DIRECTIONS:
Put 1/2 Cup of cold water in the bowl of a mixer with attached whisk (or medium-large bowl if mixing with a hand mixer). Sprinkle 3 Tbsp. unflavored gelatin over the water and set aside to soften. Meanwhile, in a medium saucepan add 1 Cup honey, 1/4 tsp. salt, and 1/2 Cup water. Heat on medium heat. Using a candy thermometer, bring the mixture to 240 degrees (or the soft ball stage). This should take about 7-10 minutes. Then remove from the heat immediately.

Carefully add the hot syrup to the gelatin mixture and mix on low speed until combined. Then add 1 tsp. vanilla and increase speed to high. Beat for 5-10 minutes (or longer), or until the mixture is thick and fluffy. It will look like marshmallow fluff like the picture below.

Marshmallow Fluff
While the marshmallow is mixing, in a large saucepan melt 2 Cubes of butter and 1/2 Cup honey (and get the popcorn popped if you haven't already). Be sure to remove all the un-popped kernels from the popcorn so no one breaks a tooth. Then once the marshmallow fluff is fluffy, add it to the butter-honey mixture in the saucepan and stir until everything is nicely melted together into a white, creamy mixture like the picture below. 

Marshmallow and butter melted together
Then pour the marshmallow mixture over the popcorn and stir until well coated, adding more or less popped popcorn as needed or desired. I found that 8 quarts was maybe not quite sufficient, so you may need a bit more. At this point you can spread the coated popcorn on wax-paper-lined cookie trays until cool. It will get slightly less sticky as it sets up, but you probably won't be able to wait that long. Eat and enjoy.

Recipe Source: healthyfamilycookin.blogspot.com

Tuesday, September 16, 2014

German Chocolate Frosting


Happy Fall! And fall means it's birthday season around here. We celebrated my husband's this weekend and it was a lot of fun. He LOVES and I mean LOVES a good German chocolate cake. I had never really been a huge fan of it until I married him and his mom shared her family recipe with me. Oh my. It is so good. We have a restaurant in town that makes really good chocolate cake including German chocolate and lots of people rave about it, but it really doesn't compare to this recipe. This is the best.

One of the nice things that we've recently discovered about German chocolate frosting is that it's a frosting that can easily be sweetened with just honey. It took a few tries to perfect, but I got it down. And just for fun, today I'll share both the original and honey-sweetened options with you. For my husband's birthday (and in the pictures), we actually made the honey-sweetened option. He loves it. There is a bit of a honey flavor that's not present in the original. It's yummy. Try both and see what you like.

P.S. Don't worry, someday I plan to share the cake recipe found in these pictures with you. Believe it or not, it is entirely honey-sweetened, 100% whole-grain, and gluten free. And tastes amazing. Especially with this German Chocolate frosting on top. It's so nice to be able to celebrate a birthday with a delicious treat that's made from scratch from real ingredients and isn't just nutrition-less garbage.


German Chocolate Frosting
Printable Recipe

*Makes enough to frost 1 regular-sized cake

INGREDIENTS:
1/2 Cup Butter
1 Cup white sugar (or 1/2 Cup honey)
1 Cup evaporated milk
3 egg yolks
1 tsp. vanilla extract
1 Cup chopped walnuts or pecans
1 Cup shredded coconut

DIRECTIONS:
In large saucepan, melt butter over medium heat. Add sugar (or honey), evaporated milk and egg yolks. Whisk well until mixture is fully incorporated. Bring mixture to a boil, stirring often. Simmer on medium low heat, stirring, for about 12 minutes or until mixture turns brown and thickens. Remove from heat and then add vanilla, nuts, and coconut. Cool before using as a frosting or in a German chocolate pie. To cool quickly, put pan in bowl of ice cold water and stir until cooled.

*Recipe Source: Adapted from a family recipe shared with me by my Mother-in-law Jenny.

Tuesday, September 2, 2014

Honey Sweetened Lunchbox Peach Tarts


We had a wonderful peach harvest this year off one of our trees, a fair harvest off another and will enjoy our first (very meager) harvest two more two trees later this month. Is there anything better than a perfectly ripe, juicy fresh peach picked fresh off your very own tree? I really don't know. At the moment I can't think of anything. 

We've actually had such a great harvest that we've had more than we could eat fresh. Which is saying something because we eat a LOT of fresh peaches. I've loved it because I've gotten to try out and discover some delicious recipes with them this year.

The recipe I'm posting today is a peach spin off of these lunchbox apple tarts that I posted earlier this year. Have you tried them yet? You really should. They are amazing. Totally delicious. And the peach version is equally delicious, if not more. I think if I was creating a menu with these I would describe them as follows:
A light and flaky pastry filled with juicy morsels of honey-sweetened peach goodness. 
I love that if I'm acting quick and sneaky-like, I can double or triple the recipe and freeze a few. They make a wonderful, healthy treat to add to a lunch from home or serve as an after-school snack. This is all in theory of course, assuming they last that long from little peaking eyes, grabbing hands, and stuffing fingers.

Do you need any more encouragement to make these? Just look at the photos and drool a bit (I know I am). Okay done? Now get busy.


Honey Sweetened Lunchbox Peach Tarts
Printable Recipe

*Makes about 12 tarts

*Note: I often double or triple this recipe to make a large batch of these and store them in the freezer for quick lunchbox treats, a healthy afternoon snack, or even an on-the-go breakfast once in a while. To double or triple the recipe, double all of the ingredients except the egg wash at the end of the recipe. One batch of egg wash makes plenty for a triple batch of tarts.

INGREDIENTS:
1 Cup Wonder Flour
1 Cup Unbleached White Flour
1/2 tsp. salt
1/2 Cup + 2 Tbsp. softened butter, divided
1/4 Cup ice water
2 Cups peeled, cored and diced peaches (about 3 medium)
1/4 Cup raw honey
3 tsp. ultra gel or 1-1/2 tsp. cornstarch

EGG WASH:
1 large egg
1 Tbsp. water
1 tsp. honey

DIRECTIONS:
Preheat oven to 375 F. Combine wonder flour, white flour, salt, and 1/2 Cup softened butter and mix together until crumbly. Add ice water and stir until dough forms. Cover and set aside.

In a large skillet, melt 2 Tbsp. butter over medium-low heat. Add diced peaches, honey, ultra gel or cornstarch, and stir until honey dissolves and any juices from the peaches begin to thicken, about 5 minutes.

On a lightly floured counter, roll dough to 1/8" thickness and cut into 12 rounds with a 4-inch biscuit cutter (or equivalent sized bowl). Place dough rounds onto greased baking sheets. Add a Tablespoon of the peach mixture to half of each dough round. Fold opposite end of dough over peaches and seal with hands or a fork. Use a little water rubbed on your fingers to help the seal stick. Repeat with all of the tarts. Cut a small slit in the top of each pie to vent steam.

In a small bowl combine egg, 1 tablespoon water and 1 tsp. honey and stir until well blended. Brush on tops of each peach tart.

Bake tarts in a 375 F oven for 15 minutes or until golden brown and bubbly. Cool completely before storing or freezing.

Recipe Source: healthyfamilycookin.blogspot.com

Tuesday, August 12, 2014

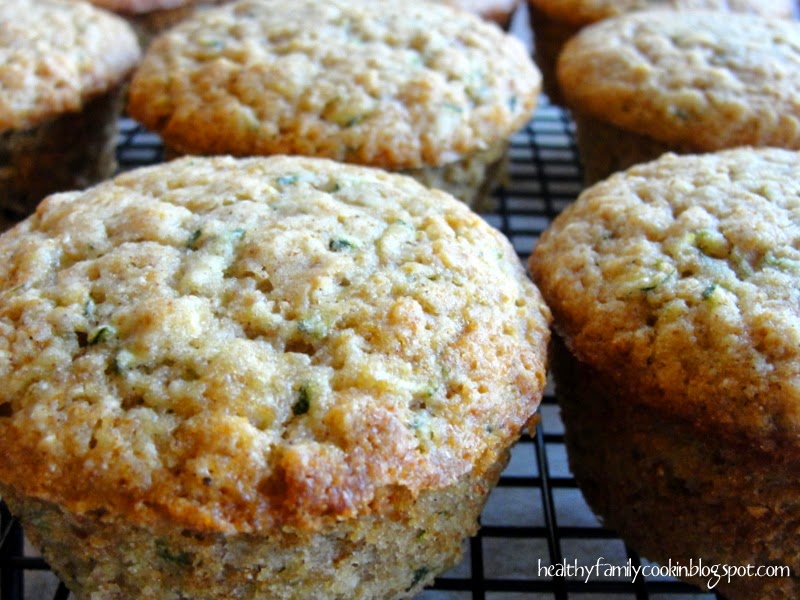
Fresh Zucchini Muffins


I don't know about you but school is sneaking up on me way to fast. All to soon the rush will be here again and questions of "What's for breakfast?", "What's for lunch?", and "What's for snack?" will plague me every day times two. Sometimes thinking up creative answers to those questions is difficult. My first grader won't even eat a sandwich so that throws some extra fun into the school lunch mix this year. 

In my efforts of late that alternate between freaking out and trying to prepare for those inevitable school days just around the corner, I ran across this recipe that I started perfecting last year but never finished before I ran out of the zucchini harvest. Well I'm happy to report that my zucchini harvest is back in full swing so I've completed the task and this recipe is wonderful in it's perfected state. Delicious, moist, and light. Healthy, hearty, and sweet. These tender morsels of yumminess are just the thing for an easy breakfast, lunch or snack. 

But before you take the same path I did, I have to warn you. Don't even think that making a double or even triple batch of these yummy muffins and freezing them will somehow make it so you have frozen muffins when you need them during a hectic school day. Not a chance. These things have disappearing properties that are amazing. I haven't scientifically figured out how that works yet, but trust me it's true. Consider yourself warned. 


Fresh Zucchini Muffins
Printable Recipe

*Makes 12 muffins

*Note: These muffins freeze well so go ahead and make a double or triple batch!

INGREDIENTS:
1-1/2 Cups Wonder Flour
1/2 Cup Quick Oats
1/2 tsp. salt
2 tsp. baking powder
1/2 tsp. cinnamon
1/4 tsp. nutmeg
1-1/2 Cups grated zucchini (about 2 small zucchini's, grated)
1/2 Cup honey
2 eggs
1/3 Cup canola oil
1 tsp. vanilla extract

DIRECTIONS:
Preheat oven 350 F. Grease 12 muffin tins or line with crinkly paper cupcake liners. In a medium bowl whisk together Wonder Flour, quick oats, salt, baking powder, cinnamon, and nutmeg. Set aside.

In a large bowl combine grated zucchini, honey, eggs, canola oil, and vanilla. Stir well to combine, then add the flour mixture and mix until barely combined. Be careful not to over-mix or you will end up with dense muffins.

Fill muffin tins with about 1/3 Cup muffin batter. Bake in preheated 350 F oven for 25 minutes or until muffins turn golden brown.

Recipe Source: healthyfamilycookin.blogspot.com

Tuesday, August 5, 2014

Chocolate Wafers (Honey Sweetened)

A few weeks ago my oldest son and husband decided that they would start a challenge to see if our whole family could not eat any sugar treats, sugar drinks/soda, or candy until school started. School was 30 days away at the time and I of course though. Duh! Of course I'll do that with you! :) It's been two full weeks and I've been amazed at the stuff my kids have passed up: donuts, candy bars, lemon meringue pie (that was a bit hard for yours truly...), and TONS more junk. They have done soooo well! And don't worry...it will all pay off. At the end of 30 days we will have a special adventure trip (I think it involves fishing on a floating device of some sort) as the reward.

So have I noticed a difference? I have. I love watching the effects of my family becoming more healthy. I know for myself I feel better. More energy. I get more done. I feel invigorated. I have more patience. Healthy is great. And I really am hoping that at the end of the 30 days my kids will be better prepared to make wise decisions about the sugar treats they take into their bodies instead of just eating every treat that comes around.

So what about you? Have you tried anything like this in your family? I've been so pleased with how it's turned out. We still enjoy treats. Just treats with no sugar. And there's so many wonderful treats like that out there. One of our favorites this summer has been watermelon. It's so delicious. 

Today I'm going to share another of our newly discovered honey sweetened treats (with no processed sugar). These are the chocolate version of these vanilla wafers that I discovered last year. We still love the vanilla version. They are so yummy. And these chocolate wafers. They are so good and not hard to make. They will make the perfect school lunch or after school snack when school comes around too. Hope you enjoy them!   


Chocolate Wafers (Honey Sweetened)
Printable Recipe

*Makes 12-13 dozen wafers

INGREDIENTS:
1/2 Cup butter
1/2 Cup raw honey
1 egg
1 tsp. vanilla extract
1 Cup wonder flour
1/4 cocoa powder
1/4 tsp. sea salt
1/2 tsp. baking powder

DIRECTIONS:
Preheat oven to 325 F. In a medium mixing bowl cream butter and honey together until smooth. Add egg and vanilla and mix well until combined. Add wonder flour, cocoa powder, sea salt, and baking powder and mix until smooth. Spoon mixture into a zip-lock sandwich bag and zip the top. Cut off a tiny bit of the corner and pipe the dough onto a parchment lined baking sheet in nickel sized blobs about 1/2" apart. Bake for 8 minutes at 325 F. Then turn off oven and let sit in oven for another 5-10 minutes. Be sure to watch carefully so they don't burn. Remove from oven and let cool until crispy and then remove from pans to cool completely. Repeat with remaining dough, reusing the parchment paper. Cool completely and then store in an airtight container. They should fresh for a couple of weeks, but I doubt if they'll last that long.

Recipe Source: Adapted from this vanilla wafers recipe


Why not try the chocolate AND vanilla wafers together? I may have done that...

Tuesday, July 15, 2014

Watermelon Slushies {Naturally Sweetened}

Okay remember last month when I was complaining of the heat? Yeah that was nothing. And remember those dreams of happily sipping mango slushies while the kids frolick peacefully in the sunshine? Yeah well at least I've got the slushie part down. We're still working on the peacefully frolicking part I'm afraid. Are you in the same boat? Never fear because now you can practice even more with these watermelon slushies. Seriously these are so good. 

I have to admit I was a little wary of them when I first saw the recipe. Let me try to explain. We're kind of watermelon snobs in our family. Not kidding. My Mom is a watermelon lover. People have called her Watermelly as a nickname. This is kind of a tangent but she and and I had a watermelon contest on the 4th of July. We didn't plan it or anything, but I should have realized there was no way I should mess with her expertise. We both picked out watermelons from two different stores and we opened them both to see which was the best tasting. And hers won hands down. As I mentioned I should have known not to mess with Watermelly. 

Anyway, back to the watermelon snobs thing. I grew up eating watermelon every day of summer from June to August (just about). It was "the thing" to have in summer. And life was always better after a watermelon bust as we called it. Yum.

So I was wary of the recipe because I thought there's no way I can "waste" a good watermelon by sticking it in the freezer. Because there's no such thing as "leftover" watermelon. IT ALL GETS EATEN. ALWAYS. 

Well I took the plunge and I'm glad I did. These are so good. You know how you kind of crave nice cold frozen treats in the summer and it's so easy just to stop for ice cream or a slushie or frosty or you name it? Well I've been trying even more to have naturally sweetened treats lying around so there's no need to do that and this is such a yummy yummy one. I haven't tried it on the expert yet. Watermelly, if you're reading this you'll have to try it and let me know. :) Happy Summer! Hope yours is going great!


Watermelon Slushies {Naturally Sweetened}

*Serves 2-3

INGREDIENTS:
Juice of 1/2 lime or small lemon
1 ripe banana, peeled (not frozen)
2 Cups Frozen Watermelon

DIRECTIONS:
Combine ingredients in order in a blender (I've found that the order does help it blend a little easier). Blend until smooth and serve immediately. 

Recipe Source: Very slightly adapted from All thing Beautiful, changed the recipe directions to simplify blending a bit. 

Tuesday, June 17, 2014

Fresh Mango Slushie

I don't think I've told you of my new obsession with mangoes lately, have I? Oh my. They've become the thing around here lately. They are pretty much my lifeline to happiness. Just ask my family. I don't know why. Maybe it's because my husband took off on a business trip to Samoa last month and I didn't get to go. But ever since I've been dreaming of sitting on a beautiful beach sipping coconuts and eating fresh mangoes. Not really, but it sounds nice, right?

Well the other day I had this grand idea that I could great the perfect mango slushie much like this strawberry slushie of yesteryear. Don't you love that word yesteryear? It sounds like I've popped out of the 1800's or something. Well anyway, I've been just dying to experiment with it and guess what? You're in luck because I finally did. Summer has hit and it's been warm (I can't say hot because I know July will hit and I'll eat my words). This slushie is so cool and refreshing. And yes it has no processed sugar. Yay for healthy summer treats! The mint leaves are the secret ingredient. You can leave them out if you absolutely have to, but oh my, they add just the right amount of freshness. They take this slushie a step up from amazing to superb.

So maybe I can't go to Samoa and sip coconuts and eat fresh mangoes, but now I can definitely make a mango slushie and sip it under a shade tree while watching the kids frolicking peacefully in the sunshine. Sounds dreamy right? If only, if only... Happy Summer!


Fresh Mango Slushie
Printable Recipe

*Makes about 4 1-cup servings

INGREDIENTS:
Juice of 1 medium lemon or 2 small limes (fresh is best, I like the lemon slightly better)
1/4 Cup honey or Xagave
2 large mangoes, peeled and seeded
4-5 fresh mint leaves, plus more to garnish
2-3 Cups ice

DIRECTIONS:
Add lemon or lime juice, honey or Xagave, mangoes, and mint leaves to blender and blend until pureed. Then add the ice and blend until mixture reaches a "slushie" consistency. Add more ice if needed to reach desired consistency. Then taste and add more sweetener if needed. Serve immediately.

Recipe Source: healthyfamilycookin.blogspot.com

Tuesday, April 15, 2014

Vanilla Pudding {Honey Sweetened}

I love me a good pudding. To me it spells H-O-M-E. It's amazing how easy it is to make from scratch and so much tastier, but still most people buy the boxed stuff from the store. This pudding is a Healthy Family Cookin' original, adapted from the pudding that my Mom made for us growing up. So many variations are possible - chocolate, banana, coconut (I bet you could think of more), but I think my all time favorite is the original vanilla pudding. Make sure you're prepared with a real vanilla extract. No imitation stuff please. It will make all the difference in the taste.

We make this pudding A LOT. And each time - oh yum. I've adapted it to be honey sweetened so there is no processed sugar. We love to use it on top of a warm, honey-sweetened, whole-grain cake. Seriously it's melt-in-your mouth delicious without leaving you with the after affects that comes with processed sugar. I know you'll love it to.


Vanilla Pudding {Honey Sweetened}
Printable Recipe

*Makes 3 servings

INGREDIENTS:
2 Cups Milk or Half n' Half (or use 1 Cup Whipping Cream and 1 Cup Milk)*See Note
1/4 tsp. salt
3-5 Tbsp. Flour
1/4 Cup honey
1 egg
1 Tbsp. butter
1 tsp. vanilla

DIRECTIONS:
Measure the milk into a glass measuring cup and whisk the flour and salt briskly into the cold milk. Whisk until mixture is thoroughly combined (this will prevent lumping). Use less flour (3 Tbsp.) for a fairly runny pudding. Use more flour (4-5 Tbsp.) for a thicker pudding. I actually love it both ways, it's just up to your own preference.

Once mixture is combined, pour into a medium, heavy duty sauce pan. Add 1/4 Cup honey and heat over medium to medium-low heat, until milk is warm (not boiling) and it starts to thicken. Whisk occasionally at the beginning and more often as the mixture starts to thicken. This also will prevent lumping.

When mixture thickens (if you only used 3 Tbsp. of flour the thickening will be very subtle at this point) add 1 egg and immediately whisk briskly until egg combines with milk mixture. The quicker you whisk it in, the less egg-white strings you will get. If you're opposed to the strings all together you could experiment with using just an egg yoke, but I've never been quite that picky. Allow egg to cook (while still whisking) for a couple of minutes until the pudding custardizes slightly (My spell checker tells me that custardizes is not a word, but I'm using it to mean "tastes custard-y").

At this point you can take the pudding off of the burner and while still whisking add 1 Tbsp. butter and 1 tsp. vanilla. You can strain the pudding through a fine mesh strainer after it is cooked to remove any lumps if you want or skip this step if it fairly smooth. Pour into serving dishes and allow to cool slightly before serving. You can also cool it completely and serve at room temperature or refrigerate it and serve chilled. Either way it is delicious. If you are making this ahead of time and serving it chilled, I recommend using only 3 Tbsp. of flour as the pudding does thicken even more in the refrigerator.

*Note: As I mentioned, we've made this recipe dozens of times and love all the variations. Of course the whipping cream and milk option is my favorite. But often all we have is regular milk and it's still amazing. You could try it with other kinds of milk too, almond, coconut etc. Let me know if you do. I'd love to hear how they turn out, as I've never tried them.

VARIATIONS: 
Chocolate: Add 3 tsp. cocoa or a square of dark chocolate
Banana: Add slices of a ripe, sweet banana to each serving dish before pudding
Coconut: Fold in 1/2 Cup shredded coconut when finished

Recipe Source: healthyfamilycookin.blogspot.com adapted from a recipe from my Mom

Tuesday, March 4, 2014

Lunchbox Honey Apple Tarts

Lunch is an important part of the day, especially for kids at school. While there's always talk of improving the health of school lunches, I've found that it still doesn't meet my standard for a budget friendly or healthy meal for my kids. But I'm always torn because I remember growing up how important lunch was to me. Most of my friends ate "school lunch" and I have to admit that I felt a little left out with my home lunch most days. My parents understood and we got to eat one school lunch every month. We looked forward to that and would always plan it for a day when they'd have pizza or another kind of our favorite food. School lunches were discussed most Monday nights in our home growing up during family night or "family home evening" as we called it. We joke about that now, but it really meant a lot to us. It was a huge deal. And it's a big deal to my kids now. Especially my third grader who eats home lunch at school most days like I did. I'm always on the look out for fun and healthy meals that I can include in his lunch to make home lunch exciting and fun for him.

These apple tarts are one of the seven lunch wonders of the world for us right now. We got a bunch of apples from a neighbor and I've been making these a lot to freeze and put in his lunches. He loves them and would eat them every meal if I let him. I try to save them mostly for lunches so he'll have a fun thing in his lunch to look forward to that is also healthy. I have to sneak one now and again too because they're one of my favorite healthy treats around.

So what do you think? Home Lunch? School Lunch? What did you grow up with? What do you do to make your kid's lunches fun and healthy? I'd love to hear your ideas. Have a great day!


Lunchbox Honey Apple Tarts
Printable Recipe

*Makes about 12 tarts

*Note: I often double or triple this recipe to make a large batch of these and store them in the freezer for quick lunchbox treats, a healthy afternoon snack, or even an on-the-go breakfast once in a while. To double or triple the recipe, double all of the ingredients except the egg wash at the end of the recipe. One batch of egg wash makes plenty for a triple batch of tarts.

INGREDIENTS:
1 Cup Wonder Flour
1 Cup Unbleached White Flour
1/2 tsp. salt
1/2 Cup + 2 Tbsp. softened butter, divided
1/4 Cup ice water
2 Cups peeled, cored and diced apples (about 2 medium)
1/4 Cup raw honey
1 tsp. ultra gel or 1/2 tsp. cornstarch
1/4 tsp. ground cinnamon

EGG WASH:
1 large egg
1 Tbsp. water
1 tsp. honey

DIRECTIONS:
Preheat oven to 375 F. Combine wonder flour, white flour, salt, and 1/2 Cup softened butter and mix together until crumbly. Add ice water and stir until dough forms. Cover and set aside.

In a large skillet, melt 2 Tbsp. butter over medium-low heat. Add diced apples and cook until apples soften, about 5 minutes. Add honey, ultra gel or cornstarch, and cinnamon to apples and stir until honey dissolves and any juices from the apples begin to thicken, about 5 more minutes.

On a lightly floured counter, roll dough to 1/8" thickness and cut into 12 rounds with a 4-inch biscuit cutter (or equivalent sized bowl). Place dough rounds onto greased baking sheets. Add a Tablespoon of the apple mixture to half of each dough round. Fold opposite end of dough over apples and seal with hands or a fork. Use a little water rubbed on your fingers to help the seal stick. Repeat with all of the tarts. Cut a small slit in the top of each pie to vent steam.

In a small bowl combine egg, 1 tablespoon water and 1 tsp. honey and stir until well blended. Brush on tops of each apple tart.

Bake tarts in a 375 F oven for 15 minutes or until golden brown and bubbly. Cool completely before storing or freezing.

Recipe Source: healthyfamilycookin.blogspot.com

Tuesday, February 11, 2014

Oatmeal Chocolate Chip Cookies {Whole Grain & Sugar Free}

Can one ever have enough sugar free cookie recipes? I think not. So today I'll share one of my latest favorites with you. These cookies melt-in-your-mouth with a soft, but chewy texture. Packed with whole grains and sugar-free they not only taste delicious but are loaded with nutrients too. My husband and I ate almost a half a batch of these as part of our date the other day (speaking of dates have you checked out my post with more than 50 Frugal Date ideas? Valentines Day is coming up...). He doesn't know it but I froze the other half for later or else they would be gone too. Being a food blogger/photographer has its downsides. One is that every time I post a picture of yummy food I want to eat it. Right now. Well all I can say is it's a good thing I saved a few in the freezer. I'll be going now. See you later...


Oatmeal Chocolate Chip Cookies
Printable Recipe

*Makes 2 dozen cookies

INGREDIENTS:
1/2 Cup raw honey
1/2 Cup (1 stick) softened butter
1 egg
1 tsp. vanilla
1-1/2 Cups Wonder Flour
1-1/2 Cups quick oats
1 tsp. baking soda
1/2 tsp. salt
1/2 Cup Chocolate Chips (I use these Sugar-free Chocolate Pieces)

DIRECTIONS:
Preheat oven to 350 F. In a bowl or the bowl of a stand mixer combine butter and honey and mix until creamy, scraping the sides as needed. Add the egg and vanilla and combine, scraping down the sides again as needed. In another small mixing bowl add the Wonder Flour, the quick oats, baking soda, and salt and stir until combined. Then add the dry ingredients to the combined wet ingredients. Mix well. Add the chocolate chips and stir to combine. Scoop out about 1-1/2 Tablespoons worth of dough and roll into a ball (I like to use a 1-1/2 Tbsp. cookie scoop for this) and place on ungreased cookie sheet. Flatten dough balls slightly with a wet hand. Repeat with dough until there are 12 per cookie sheet. Bake one sheet at a time in preheated 350 F oven for about 9 minutes or until edges are slightly golden brown.

Recipe Source: Slightly adapted from a recipe from the web that is no longer hosted. 

Tuesday, January 7, 2014

Honey Yogurt Dip & Tips for Sugar-free

The holidays were definitely holidays for me. And I indulged in a bit more sugar than I should have. I paid for it by feeling sluggish, achy, cranky, and overall just yucky. Now that the New Year is here, I've recommitted to my sugar-free goal because I don't like myself that way. I like my sugar-free self better. But if there's anything I've learned in the last year of cutting back on sugar, it's that you have to have a sweet replacement for it. Especially during the first few weeks of the "detox" phase when you begin. I don't like to use the chemical sweeteners. I prefer a more natural approach to sweetening. So in honor of re-instating my goal of 6 days a week without sugar I'd like to share with you a this delicious recipe sweetened with raw honey.

I actually made this for New Year's Eve because by then I was so sugar-ed out that I couldn't even stomach the thought of making a dessert with sugar. This was such a yummy treat and literally takes minutes to whip together. I've eaten the leftovers for breakfast, lunch, and dinner since then. My Mom is actually the one who discovered how delicious it is dipped on breadsticks. You've gotta try it. So yummy. Our neighbors brought us these granny smith apples from their orchard and we are loving them dipped in this. Tart mixed with sweet. Perfect combination. So whether you go with breadsticks or fruit, you can't go wrong. In fact, try both. Double Yum!

And just in case you are looking, here are some more of my favorite sugar-free recipes and some tips on how to curb a sweet tooth. Happy New Year!


Honey Yogurt Dip
Printable Recipe

*Makes about 2 Cups

INGREDIENTS
2 Cups plain yogurt (thick style like Greek works the best; if using homemade, strain off some of the whey through cheesecloth first)
1/2 Cup honey
1/2 tsp. ground cinnamon
Your choice of fresh fruit or bread sticks. My choices would be apples, strawberries (in season), or these breadsticks.

DIRECTIONS
In a medium bowl, combine the yogurt, honey and cinnamon. Mix well until combined. Cover and refrigerate for at least an hour. Serve with fresh fruit or bread sticks. This dip keeps well in the refrigerator for a couple of days.

*Recipe Source: adapted slightly from Mel's Kitchen Cafe

Tuesday, December 17, 2013

Honey Caramel Candies

I know I haven't been posting as regular as usual. Let me just give you an update. We are in the middle of a remodel project so our household is rather disoriented at this point. Our plans include finishing half of our basement off to include a family room and a bedroom. Also we are converting a bedroom on the main floor to be a bathroom and a laundry room. So it's very exciting, but a lot of work. And a lot of disorientation, but that's okay because it will be worth it when it's done! 

But it's Christmas and I just can't pass the season without sharing with you a delicious and wonderful no-sugar holiday treat. These Honey Caramel Candies are easy to make and melt-in-your mouth delicious. They would make a great addition to stockings or a gift to give the neighbors. I like to keep them around when I am craving a treat, but don't want to cave to the sugar. Remember how I shared this recipe I discovered this fall for Honey caramel apples? Well you might recognize these honey caramel candies because they are very similar, just a few little changes to make them work as candy.


Honey Caramel Candies
Printable Recipe

INGREDIENTS:
1 Cup raw honey
1 Cup heavy cream
1/4 tsp. salt
1/2 tsp. vanilla extract

DIRECTIONS:Lightly butter a 8x8" or 9x9" square pan and set aside. In a heavy saucepan over medium heat, combine honey, heavy cream and salt. While it is heating, whisk together the mixture until combined and then bring to a rolling boil. Reduce heat until the mixture reaches a simmer (it is still bubbling but not splattering all over). Stir and scrape sides of pot down occasionally. Turn down heat slightly if mixture starts to scorch on the bottom. Keep heating until the temperature on a thermometer inserted in the sauce reaches 240-245 degrees (this may take about 20-30 minutes). 

When temperature is between 240 and 245 degrees, remove from heat, add vanilla extract and stir to combine. Pour caramels into prepared pan and let sit at room temperature for 2 hours or until cool and set.

When cool, remove the sheet of caramels from the pan and cut into pieces using a large knife. Wrap each caramel in a piece of wax paper, twisting the ends to secure.

Recipe Source: healthyfamilycookin.blogspot.com

Thursday, October 31, 2013

Honey Caramel Apples

I can't wait to post today's recipe! It's a perfect no-sugar Halloween (or Fall) treat! Truly delicious and I'm craving one right now. Happy Halloween!


Honey Caramel Apples

INGREDIENTS:
4-6 crisp apples (I like golden delicious)
1 Cup raw honey
1 Cup heavy cream
1/4 tsp. salt
1/2 tsp. vanilla extract
Sprinkles, cookie crumbs, chopped nuts, etc.

DIRECTIONS:
First put the apples in the fridge to chill while you are making the caramel. In a heavy saucepan over medium heat, combine honey, heavy cream and salt. While it is heating, whisk together the mixture until combined and then bring to a rolling boil. Reduce heat until the mixture reaches a simmer (it is still bubbling but not splattering all over). Stir and scrape sides of pot down occasionally. Keep heating until the temperature on a thermometer inserted in the sauce reaches 260 degrees (this may take about 30-45 minutes). 

While caramel is cooking, prepare apples by washing and drying them completely. Then skewer them with a popsicle stick and place them back in the fridge to continue chilling until caramel is ready. Line a baking sheet with parchment paper and set aside (wax paper doesn't work too well as the hot caramel melts to it).

When caramel has reached 260 degrees, remove from heat, add vanilla extract and stir to combine. Let this mixture sit for about 5 minutes or until it has thickened slightly, but is still a workable consistency, stirring occasionally. 

Remove apples from fridge and dry thoroughly again (they need to be completely dry for the caramel to stick to them). Dip apples in caramel, rolling and twirling, so it gets well coated. Let excess drip off and then place on prepared parchment paper. If, during this process, caramel in pan gets too hard to coat the apples just heat it until it's thin again. 

Sprinkle with sprinkles, cookie crumbs, or chopped nuts, if desired. Cool apples in the refrigerator for 10-20 minutes to set the caramel and then enjoy!

Recipe Source: Slightly adapted from Our best bites


Tuesday, June 11, 2013

Strawberry Lemonade Pops (Sugar Free)

It's getting hot! And a cold, sweet treat tastes so yummy. I've been experimenting with different sugar free options and these strawberry slushies are still one of our favorites. I discovered that if you freeze the slushies into Popsicle molds you get the most wonderful strawberry lemonade Popsicle you've ever tasted. Or if you don't have Popsicle molds (and are on a budget), small cups with Popsicle sticks works just as good. I love to keep a bunch on hand in my freezer for a quick, cool summer treat. Enjoy!
These strawberries were picked fresh from our garden! Aren't they beautiful?
Strawberry Lemonade Pops (Sugar Free)
Printable Recipe

*Makes 8-12 Pops

INGREDIENTS
Recipe fresh or frozen Strawberry slushies 
8-12 Popsicle Molds or 4 oz. plastic cups & Popsicle sticks

DIRECTIONS
Pour strawberry slushie mix into Popsicle molds or plastic cups. Place Popsicle mold lids on or place a Popsicle stick in the center of each cup. Freeze until firm, about 4-8 hours.

Recipe Source: healthyfamilycookin.blogspot.com


Sugar free is not so hard when you have cool, sweet treats like this around.

Tuesday, May 28, 2013

Peanut Butter Oatmeal Cookies (Sugar Free)

I'm happy to say that I've completed almost five months of sugar-free six days a week. It's going great. I love finding more recipes to add to my sugar-free repertoire. These sugar free peanut butter oatmeal cookies use honey or xagave as the sweetener and are tasty as can be. I've adapted the recipe from one by Weelicious to make them not only sugar free but also to use 100% whole grain flour. Enjoy.


Peanut Butter Oatmeal Cookies
Printable Recipe

*Makes 30 cookies

INGREDIENTS:
1/2 Cup butter, softened
1/2 Cup honey or xagave
1 egg
1 tsp. vanilla
1 Cup peanut butter
1-1/2 Cup whole grain flour (my choice would be oat flour or wonder flour)
1 Cup rolled or quick oats
1 tsp. baking soda
1/2 tsp. salt

DIRECTIONS:
Preheat oven to 350. In a stand mixer, combine the butter and honey (or xagave) and mix for about one minute. Add the egg, vanilla and peanut butter and beat for another minute or until smooth. In a separate bowl combine together the dry ingredients and mix. Slowly add the dry ingredients to wet and mix to incorporate. Scoop dough into two tablespoon amounts and drop onto ungreased cookie sheet. Using a fork, press gently down on each ball of dough to make a checkerboard pattern. Bake at 350 for 10-12 minutes or until slightly brown.

*Recipe Source: Adapted from Weelicious

Tuesday, April 30, 2013

Strawberry Slushie

It's strawberry season here and oh my! I am loving it! They are one of my favorite foods to eat - and I can hardly wait until our garden strawberries are ready. I found a rock bottom deal on strawberries a few weeks ago (62.5 cents a pound) and bought a lot. I mean A LOT! Last year I showed you how to freeze strawberries or make strawberry jam. And I still had a few bags in the freezer from last year so I found myself looking for a way to use them. I kind of stumbled upon creating this recipe in a round about way. We loved it and I've made it several times since (in the name of perfecting it, right??). It's been so enjoyable, let me just tell you. We've missed ice cream since going sugar free and while this isn't exactly ice cream, it's a REALLY easy cold dessert that satisfies that "ice cream" part of the sweet tooth.
Fresh Strawberry Slushie

I'm going to show you two ways to make this dessert - you can either use fresh strawberries or frozen. There is a little bit of a difference with the two, but both are yummy. With the fresh strawberries, the texture is a bit icier like a slushy you would find at 7-11. I think I may slightly prefer making this with fresh strawberries just because of that. But both are yummy and both are easy to make.

Fresh Strawberry Slushie
Printable Recipe

*Makes about 4 1-Cup servings

INGREDIENTS:
juice of 1 lemon (fresh lemon juice is best)
1/4 Cup honey or xagave (or more to taste)
about 3-4 Cups fresh whole strawberries, washed with stems removed (between 1 and 2 lbs.)
about 2 Cups ice

DIRECTIONS:
Add lemon juice, honey or xagave and fresh strawberries to the blender and blend until strawberries are pureed. Then add the ice and blend until mixture reaches a "slushie" consistency. Add more ice or strawberries if needed to reach desired consistency. Then taste and add more sweetener if needed. Serve immediately.

*Recipe Source: healthyfamilycookin.blogspot.com

Frozen Strawberry Slushie
Printable Recipe

*Makes about 4 1-Cup servings

INGREDIENTS:
juice of 1 lemon (fresh lemon juice is best)
1/4 Cup honey or xagave (or more to taste)
1 to 1-1/2 Cups water
about 3-4 Cups whole frozen strawberries

DIRECTIONS:
Add lemon juice, honey or xagave and water to the blender and blend until mixed together. Then add frozen strawberries and blend until mixture reaches a "slushie" consistency. Add more water or strawberries if needed to reach desired consistency. Then taste and add more sweetener if needed. Serve immediately.

*Recipe Source: healthyfamilycookin.blogspot.com

I love these friendly fruits :)
This week I'll be linking to some of these link parties.

Tuesday, April 16, 2013

Easy Pear Sauce (No Sugar)

After I posted on fresh peach syrup a few weeks ago I thought I'd try creating a no sugar pancake/waffle topping with pears. I was amazed at how easy this recipe came together and how tasty it was. Even easier than the peach syrup (and that was easy). Since I've gone sugar free six days a week, I've missed being able to eat my favorite pear jam every day. And while this is not pear jam, it is a tasty alternative that I can enjoy that is satisfyingly sweet naturally.


Easy Pear Sauce
Printable Recipe

*Makes 2-1/2 to 3 Cups Pear Sauce

*Note: I make this sauce with home-canned pears. As an alternative you can use ripened fresh, pears (make sure you've ripened them enough so that they have natural sugar otherwise it won't be very tasty) and steam in a little water until just barely tender. I don't recommend using store bought canned pears because they are too soft and when pureed turn into something that resembles, well...baby food.

INGREDIENTS:
1 Quart home-canned pears

DIRECTIONS:
Pour quart of home-canned pears into strainer and drain off juice.*See Note Below Place drained pears into a blender and pulse 4 to 5 times or until you get a chunky, applesaucey-type texture. Do not blend too much or the texture will be less than desirable. Enjoy on pancakes or waffles or just plain.

*Note: You could argue with me that this recipe isn't totally sugar free because the pears were packed in sugar syrup. I'm not going to be that picky, myself. If you're a purist, you can rinse the pears to get the remaining sugar off, or pack your pears in something other than a sugar syrup when you can them. The real reason for using sugar in the syrup when canning is to keep as much of the natural sugar in the pears as possible, otherwise it will leach out into the juice around it and the pears themselves will be left flavorless.

*Recipe Source: healthyfamilycookin.blogspot.com


I discovered a new favorite whole-grain pancake recipe that I will be posting soon! :)

Tuesday, March 26, 2013

Fresh Peach Syrup (No Sugar)

One of the things that I've missed being sugar-free six days a week is the sweet pancake and waffle toppings that I used to enjoy. But most syrups, jams and jellies are loaded with sugar. I usually eat my waffles or pancakes with unsweetened applesauce, but recently I came up with this peach syrup as a variation that I love. 

Fresh Peach Syrup (No Sugar)
Printable Recipe

*Makes about 1 cup

INGREDIENTS:
1 Cup peach puree (I used a blender to puree the peaches) *See Note
2 Tbsp. Xagave nectar
Sprinkle of vanilla powder, optional

*Note: If peaches aren't in season you can use thawed frozen or canned peaches with all the liquid drained off

DIRECTIONS:
Combine ingredients and mix well. Serve on fresh waffles or pancakes. Refrigerate leftover syrup for up to a week.

Recipe Source: healthyfamilycookin.blogspot.com

Here's some of my favorite pancake and waffle recipes to serve this syrup on:


This week I'll be linking to some of these link parties.

Popular Posts

LinkWithin

Related Posts with Thumbnails